• Skip to main content
  • Skip to primary sidebar

Cooking During Stolen Moments

  • Home
  • About
    • Privacy Policy & Disclosures
  • Recipes
    • Breakfast
    • Dessert
    • Dinner
    • Gluten Free
    • Salad
    • Side Dish
    • Vegan

Steak & Roasted Vegetable Quesadillas with Chimichurri

May 2, 2020 by KateMiller Leave a Comment

This Steak & Roasted Vegetable Quesadillas with Chimichurri recipe features a mind-blowingly delicious combination of sautéed veggies, steak, chimichurri sauce and cheese your whole family will love!

Jump to Recipe

I’ve always loved the endless possibilities that quesadillas provide. If it tastes good with cheese and can be folded inside a tortilla, it is ripe for the quesadilla treatment!

Prepping the Quesadillas

The assembly and cooking process of quesadillas can feel a little labor-intensive. That’s why I always prefer to prep the filling in advance whenever possible. For this recipe, you can prep the Steak & Roasted Vegetable filling, as well as the Chimichurri sauce, in advance.

Both the filling and the sauce can be refrigerated for 2-3 days before prepping the quesadillas. They can also be frozen if you want to prep further in advance.

Steak and roasted vegetables simmering in a saucepan.

Assembling the Steak & Roasted Vegetable Quesadillas with Chimichurri

When you are ready to make the quesadillas, make sure you give yourself at least 15 minutes to assemble and cook them. It’s best to work in an assembly-line fashion and continue assembling as you cook.

You’ll start the quesadilla process by buttering one side of each tortilla. While your skillet or griddle warms up, start putting them together.

Sprinkle a handful of cheese on the un-buttered side of a tortilla. Then, spoon on a heaping portion of the steak and roasted vegetables. Next, drizzle some Chimichurri sauce on top.

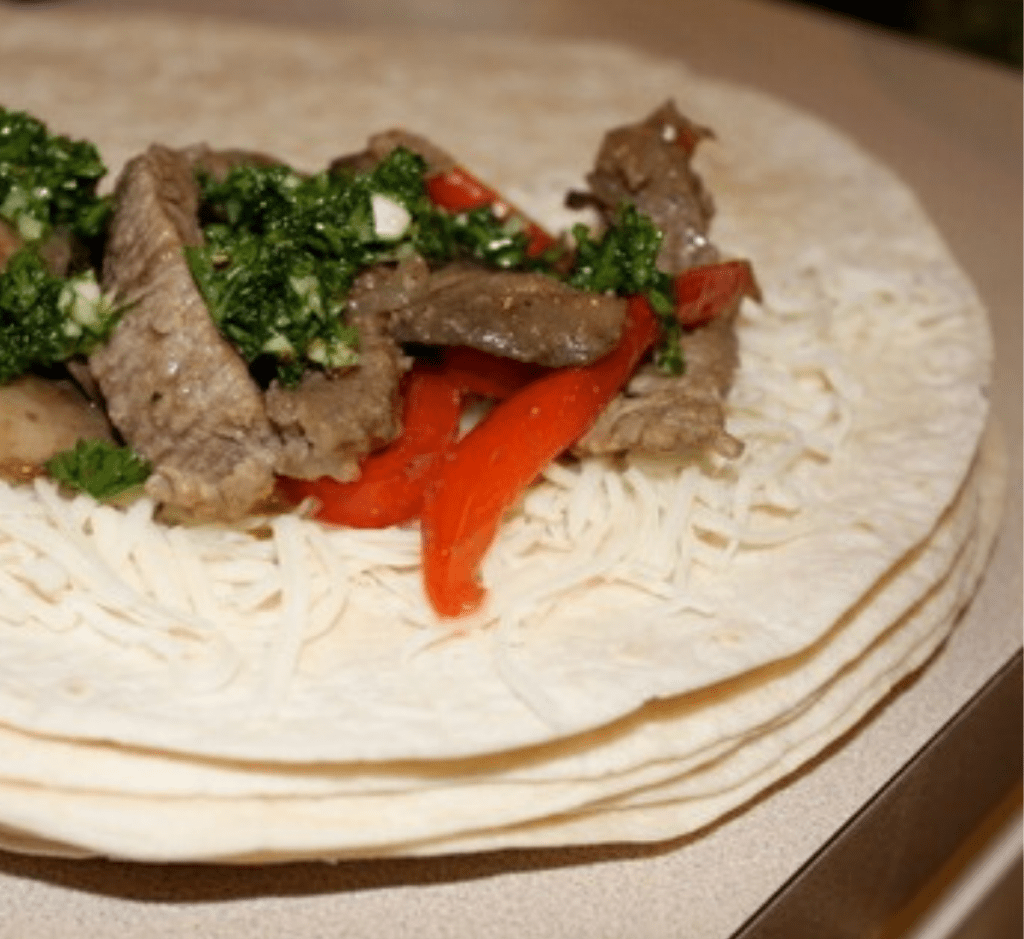
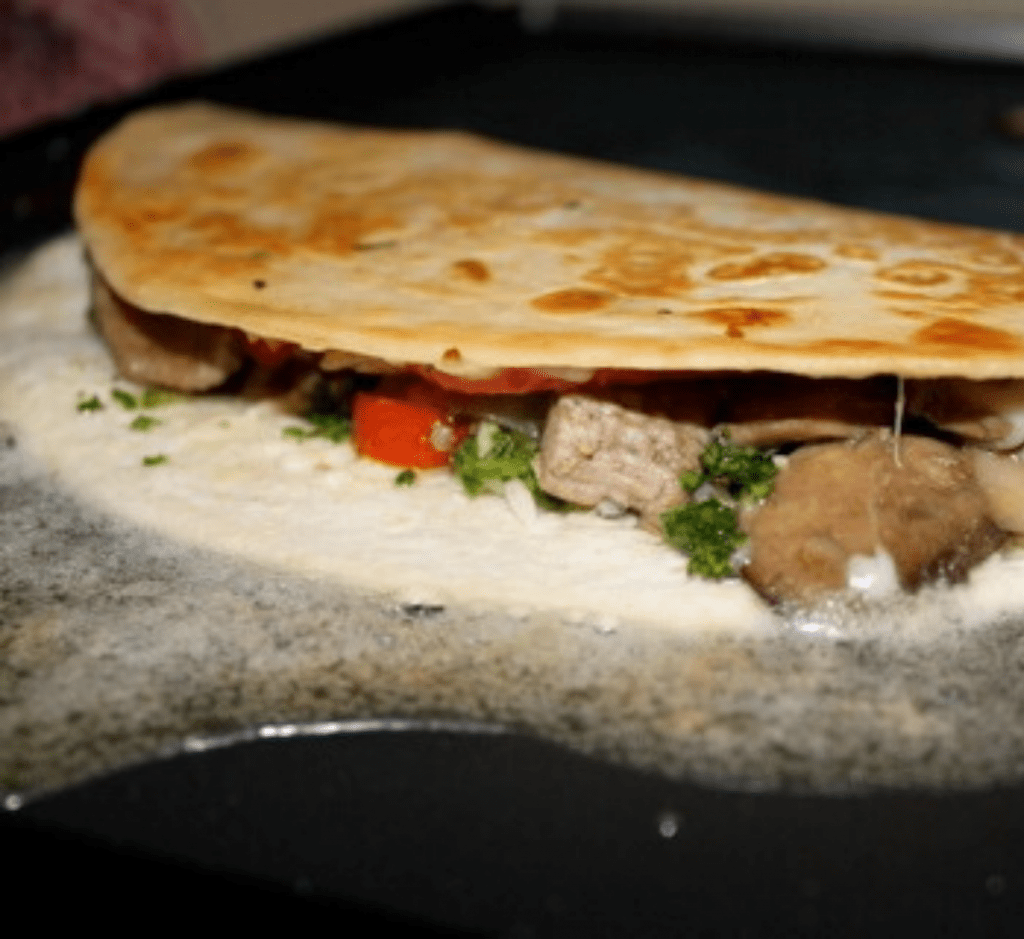
Fold the topped tortilla in half and place on the heated skillet or griddle. Cook for about 3 minutes per side, until the cheese is melted, the filling is warm and the outside is golden brown.

This is a great time to get your kids involved in the kitchen – they can butter the tortillas, sprinkle on the cheese, and/or spoon on the fillings.

Note: you can use bottled Chimichurri sauce if you’d like. However, I much prefer the fresh flavor of homemade. Here is my Homemade Chimichurri Recipe.

Finished Steak & Roasted Vegetable Quesadillas with Chimichurri on a plate.

Steak & Roasted Vegetable Quesadillas with Chimichurri

This Steak & Roasted Vegetable Quesadillas with Chimichurri recipe features a mind-blowingly delicious combination of sautéed veggies, steak, chimichurri sauce and cheese your whole family will love!
Print Recipe Pin Recipe
Prep Time 20 minutes mins
Cook Time 10 minutes mins
Total Time 30 minutes mins
Course Main Course
Cuisine American
Servings 4

Ingredients
  

  • 1 small Yellow onion
  • 1 Red pepper
  • 1/2 lb. Mushrooms
  • 1 lb. Bottom round steak (or other cut of choice)
  • 2 T. Butter
  • 2 T. Olive oil
  • Salt & pepper (to taste)
  • 8 Flour tortillas (Burrito sized)
  • 2 c. Shredded Monterey Jack cheese
  • 1 c. Chimichurri sauce
  • Extra butter (for spreading on the tortillas)

Instructions
 

  • Thinly slice onions, red peppers, mushrooms and steak (against the grain).
  • Heat butter and oil in a large skillet. Add sliced veggies and cook for 3 minutes. Add sliced steak, season to taste with salt and pepper and cook until steak is cooked, about 5-8 minutes, depending on the thickness of your slices.
  • Butter one side of each tortilla while heating a large skillet or griddle over medium heat.
  • Top half of each tortilla with some cheese. Spoon some of the veggie and steak combination on top. Dollop some chimichurri sauce on top and then cover with more cheese. Fold in half.
  • Cook the quesadillas for about 3 to 5 minutes on each side, until golden brown and cheese is melted.
  • Cut into wedges and serve.  Serve with extra Chimichurri sauce for dipping.

Notes

  • Use homemade (recommended) or bottled Chimichurri sauce. Here is my Homemade Chimichurri Recipe.
  • Prep the filling ahead of time and refrigerate or freeze until using. Prepped filling will stay good in the refrigerator for up to 3 days or for several months in the freezer.
Keyword chimichurri, quesadilla, roasted vegetables, steak

Filed Under: Dinner, Recipes

Loaded Twice Baked Potatoes with Veggies

March 25, 2020 by KateMiller Leave a Comment

Much-loved Loaded Twice Baked Potatoes are filled with cheese and bacon plus an amazing flavor boost from the additions of zucchini, carrots and onions.

This “healthier” version of Loaded Twice Baked Potatoes makes a complete and robust meal that everyone will love. Eat them for breakfast, lunch or dinner!

This recipe makes a lot on purpose because these potatoes are perfect for the freezer. Spend an afternoon making this big batch and enjoy them for weeks to come.

Three loaded baked potatoes with veggies lined up on a dinner plate.

Loaded Twice-Baked Potatoes with Veggies

Much-loved Loaded Twice Baked Potatoes are filled with cheese and bacon plus an amazing flavor boost from the additions of zucchini, carrots and onions.
Print Recipe Pin Recipe
Prep Time 30 minutes mins
Cook Time 1 hour hr
Total Time 1 hour hr 30 minutes mins
Course Appetizer, Side Dish
Cuisine American
Servings 20

Ingredients
  

  • 10 medium-sized Russet potatoes
  • 1/2 cup Milk
  • 1/3 cup Sour cream
  • 1/4 cup Butter melted
  • 1 teaspoon Salt
  • 1 teaspoon Garlic powder
  • 1/2 teaspoon Pepper
  • 1 Zucchini (finely diced or shredded)
  • 2 Carrots (peeled and finely diced or shredded)
  • 4 Green onions (sliced)
  • 1 pound Bacon (cooked and crumbled)
  • 1 cup Shredded cheddar cheese

Instructions
 

  • Scrub potatoes and pierce several times with a fork. Place on a baking sheet and bake at 375 degrees for about an hour, until soft to the touch. Cool until easy to handle.
  • Cut potatoes in half lengthwise and scoop out the potato to with 1/4 inch of the skin, being careful to leave the skin intact. Place the scooped out potatoes in a large bowl and mash until smooth.
  • Stir milk, butter and sour cream into the potatoes until creamy. Add remaining ingredients and stir until completely combined. Spoon the filling into the potato shells.
  • Bake at 350 degrees for 15-20 minutes, until lightly browned and crisped on top. If you want the top to be extra crispy and browned, place under a broiler for about 3 to 5 minutes.

Notes

  • If you do not want to make extras for the freezer, you can easily cut this recipe in half.
  • To freeze the extra potatoes, cool completely after baking and then flash freeze on a cookie sheet. Once frozen, place in a freezer bag and return to the freezer. To reheat from frozen, bake at 350 degrees for 20 minutes or microwave for 3 to 5 minutes.
Keyword Loaded Twice-Baked Potates

Filed Under: Appetizers & Snacks, Recipes, Side Dish

Homemade Hamburger Helper Cheeseburger Macaroni

March 25, 2020 by KateMiller Leave a Comment

This homemade Hamburger Helper recipe for Cheeseburger Macaroni cooks up quickly in one-pot for that convenience that you love with an infinitely better taste!

Cheeseburger Macaroni can easily be made gluten free by just swapping the macaroni noodles for a gluten free brand.

Kids and adults alike will absolutely love this meal. It tastes so much better than the boxed version, but it cooks up just as easily.

A serving of homemade hamburger helper cheeseburger macaroni on a white plate with a side of green beans.

Homemade Hamburger Helper Cheeseburger Macaroni

This homemade Hamburger Helper recipe for Cheeseburger Macaroni cooks up quickly in one-pot for that convenience that you love with an infinitely better taste!
Print Recipe Pin Recipe
Prep Time 10 minutes mins
Cook Time 20 minutes mins
Total Time 30 minutes mins
Course Main Course
Cuisine American
Servings 6

Ingredients
  

  • 1 pound Ground beef (or ground turkey)
  • 1 small Yellow onion (diced)
  • 1 teaspoon Salt
  • 1/2 teaspoon Garlic powder
  • 1/2 teaspoon Black pepper
  • 12 ounces Elbow macaroni (regular or gluten free)
  • 3 cups Beef stock
  • 2 cups Milk
  • 1/4 cup Ketchup
  • 1 1/2 Tablespoons Yellow mustard
  • 1 Tablespoon Dill pickle relish
  • 2 cups Shredded cheddar cheese
  • Additional salt and pepper (to taste)

Instructions
 

  • Put ground beef (or turkey) and diced onion in a large, deep skillet and season with salt, garlic powder, and pepper. Cook until browned and drain.
  • Stir in macaroni noodles, beef stock and milk.
  • Bring to a slow boil, stirring frequently.
  • Cover and reduce heat to low. Cook, stirring occasionally, for about 15-20 minutes, until noodles are tender.
  • Remove cover and stir in remaining ingredients, stirring to combine well. Season with additional salt and pepper, if desired. If the sauce is too thin for your liking, cook for a few additional minutes.
  • Serve and enjoy!

Notes

  • If you are using gluten free noodles, I’ve found that they tend to cook more quickly than regular noodles, so check frequently.
  • Leftovers make a delicious lunch the next day!
Keyword Cheeseburger Macaroni, Homemade Hamburger Helper

Filed Under: Dinner, Recipes

Italian Sausage & White Beans

March 7, 2020 by KateMiller Leave a Comment

Hearty and flavorful Italian Sausage & White Beans is quick and easy. A one-pan, skillet weeknight dinner option that looks and tastes like you fussed.

Plated Italian Sausage & White Bean dinner

Elaborate dinners and numerous pots, pans and dishes have no place on ordinary weeknights in our house. Is yours the same?

As with all rules, there are definitely exceptions. But by and large, if it’s a dinner that only calls for one pan, you can bet I love it! Plus, it’s even better when said meal tastes amazing and has a gourmet vibe. What’s not to love?

Such is the case with this recipe!

How to make Italian Sausage & White Beans

You’ll have this awesome dinner on the table in less than 30 minutes. 5 minutes of prep time, 20 minutes of cooking time, and just one skillet are all you need. This dinner is hurried along by the addition of purchased sausage links and canned beans.

You’ll start by prepping the veggies. Dice half of a red onion, a whole red pepper and a few cloves of garlic. Then slice your Italian Sausage links.

*Tip – since the Italian Sausage links are uncooked, they are a bit more difficult to slice. Use a really sharp, non-serrated knife or toss them in the freezer for 15 minutes to make the process easier.

Next, you’ll start cooking your prepped veggies and sausage in some olive oil in a large skillet. You’ll toss in some fresh spinach, seasonings, two cans of rinsed and drained Cannellini beans (or other white bean of your choice), and a cup of chicken stock.

Once all of the ingredients have been added to the skillet, they’ll need to cook together for 10 minutes and then dinner is served. See? It really doesn’t get much easier!

Serving options and sides

I used sweet Italian sausage in this recipe, but feel free to swap it out for a spicy variety, or even a smoked or Polish sausage if you’d prefer. Chicken sausage is also a fantastic option!

We like to eat this dinner with a fresh, crusty loaf of sourdough or multigrain bread. There are lots of delicious side dish options though. Some ideas are:

  • Served alongside some pasta mixed with olive oil, roasted garlic, salt and pepper.
  • Served over creamy polenta and topped with fresh Parmesan
  • Mixed with a few cups of orzo, couscous, or white or brown rice

If you have an leftovers, mix with a few cups of chicken stock for a delicious soup. It makes an awesome lunch.

Italian sausage and spinach cooking in a skillet

Make it vegan

You can easily turn this into a vegan dinner! (It’s already naturally gluten free if you use a gluten free sausage variety.)

There are two vegan options you can choose from:

  1. Omit the sausage altogether and replace the chicken stock with vegetable stock.
  2. Use a vegan sausage and replace the chicken stock with vegetable stock.

What kind of beans should I use?

We really like the creaminess of Cannellini beans in this dish. However, feel free to use your favorite white bean, or even mix it up further by using red kidney beans or pinto beans.

Since this is an easy, one-skillet dinner, I rely on canned beans to make it easy all around. You can use dry beans that you’ve cooked if you have them on hand though. There are times when the texture difference between canned beans and fresh beans makes a difference but this is not one of those times!

Can this dinner be frozen?

You can freeze this dinner. To do so, cool completely and transfer to a freezer-safe storage bag. To reheat, plop the frozen mixture into a pot over low heat, cover and simmer until warm, stirring frequently.

I highly recommend you add this recipe to your rotation the next time you have a busy week. I know you’ll love it! It’s:

  • Easy
  • Quick
  • Customizable
  • Hearty
  • Flavorful
  • & delicious!
Italian sausage and white beans cooking in a skillet

Italian Sausage & White Beans

Hearty and flavorful Italian Sausage & White Beans is quick and easy. A one-pan, skillet weeknight dinner option that looks and tastes like you fussed.
Print Recipe Pin Recipe
Prep Time 5 minutes mins
Cook Time 20 minutes mins
Total Time 25 minutes mins
Course Main Course
Cuisine American
Servings 6

Ingredients
  

  • 1/2 Red onion
  • 1 Red bell pepper
  • 3 cloves Garlic
  • 1 lb. Italian sausage links (sweet or spicy)
  • 1 T. Olive oil
  • Salt & pepper (to taste)
  • 1 lb. Fresh spinach (trimmed and washed)
  • 2 t. Italian seasoning
  • 1/4 t. Nutmeg
  • 1/4 t. Crushed red pepper flakes
  • 2 cans Cannellini beans (or other white beans) (15 oz. cans; rinsed and drained)
  • 1 c. Chicken stock

Instructions
 

  • Dice red onion, red pepper and garlic.
  • Slice Italian sausage links.
  • Heat olive oil in a large skillet over medium heat. Add onion, pepper, garlic and sliced sausage. Season to taste with salt and pepper.
  • Cook for 5 minutes, stirring often, until sausage starts to brown.
  • Stir in spinach and seasonings. Cook another 5 minutes, until spinach is wilted. 
  • Cover skillet, reduce heat and cook over low heat for 10 minutes, until sausage is fully cooked.
  • Increase heat to medium-high and stir in beans and chicken stock.
  • Bring to a slow boil and cook until broth is reduced by half, about 3 to 5 minutes. Serve and enjoy!

Notes

  • To make the sausage easier to slice, make sure to use a sharp, non-serrated knife. If you are still having a hard time, you can firm them up slightly by tossing them in the freezer for about 15 minutes.
  • Serve with crusty bread, pasta, polenta, rice, orzo or couscous.
  • You can make this recipe up to 2 days in advance and then just reheat when you’re ready for dinner.
Keyword Italian sausage & white beans

Filed Under: Dinner, Gluten Free, Recipes

Chickpea Cucumber Salad

March 6, 2020 by KateMiller Leave a Comment

Tangy Chickpea Cucumber Salad is packed with freshness and flavor thanks to the addition of fresh parsley, black olives and a zesty marinade.

Jump to Recipe

Long before my husband and I made the switch to a whole food, plant based vegan lifestyle (check out our favorite vegan recipes), I loved chickpeas. That feeling hasn’t wavered even now that they are an almost daily part of life.

I have loved this salad for years. It is just bursting with flavor and there are so many different ways to enjoy it. The kids – even those that aren’t necessarily “bean fans” – love it, too.

Although this Chickpea Cucumber salad has a more summery vibe, I think it is a perfect fit any time of the year — as long as you can find fresh, ripe cucumbers. We enjoy it all year, especially for lunches. It’s perfect to meal prep on the weekend and then enjoy throughout the week.

How to make Chickpea Cucumber Salad

It honestly doesn’t get much easier than this recipe! With just about 10 minutes worth of prep, you can throw the salad together and then enjoy it for days afterward. Plus, it’s naturally gluten free and vegan!

To make the salad, you’ll start by combining chickpeas, sliced cucumber and black olives in a large bowl. Then you’ll whisk together the marinade. Combine olive oil, apple cider vinegar, sugar, salt and pepper, Italian seasoning or Oregano, and fresh parsley and whisk to mix well. Pour the marinade over the beans and veggies, toss to combine and refrigerate until ready to eat.

You can eat the salad right away, but the flavors mature the longer it sits. I like to make it at least 3 hours before we plan to eat.

The prepared salad will keep for at least 3 to 5 days in the refrigerator.

Variations, substitutions and additions

This is a great recipe to play around with! The base is so simple and flavorful that it opens up all kinds of options. So, feel free to customize to your hearts content.

Here are some additions that we’ve loved over the years:

  • capers
  • diced red onion
  • julienned fresh spinach
  • feta or goat cheese
  • diced fresh tomatoes
  • avocado slices
  • farro
  • quinoa
  • pine nuts
  • walnuts
  • kale

Feel free to mix and match until you find the combination that you love!

If you are adding several additional options, you might want to double up on the marinade.

Meal ideas

I love the versatility of this salad almost as much as I love it’s customization friendliness.

You can enjoy it as a side dish with all kinds of meals. It’s the perfect accompaniment to BBQ, sandwiches, hamburgers or bratwursts, and baked chicken or pork of any kind. Take it to a picnic or potluck without concern since you don’t have to worry about it staying cold.

It’s also great on its own for lunch or a quick dinner. To make it heartier, add some of the options above. My favorite lunch combinations are spinach and walnuts or farro and walnuts on a bed of fresh, massaged kale. You can also tuck the salad inside pita bread for an amazing sandwich.

However you decide to enjoy this salad (and you really can’t go wrong any way), I know that you’ll love it. It’s:

  • versatile
  • customizable
  • vegan
  • gluten free
  • easy
  • flavorful
  • & delicious
Chickpea cucumber salad on spoon with bowl in background

Chickpea Cucumber Salad

Tangy Chickpea Cucumber Salad is packed with freshness and flavor thanks to the addition of fresh parsley, black olives and a zesty marinade.
Print Recipe Pin Recipe
Prep Time 10 minutes mins
Total Time 10 minutes mins
Course Salad, Side Dish
Cuisine American
Servings 5

Ingredients
  

  • 15 oz. can chickpeas (rinsed and drained)
  • 1 large cucumber (peeled, quartered and sliced)
  • 5 oz. can sliced black olives (rinsed)
  • 1/3 c. olive oil
  • 2 T. apple cider vinegar
  • 1 t. sugar
  • 1 t. salt
  • 1/2 t. black pepper
  • 1/2 t. Italian seasoning or oregano
  • 1/4 c. fresh parsley (diced)

Instructions
 

  • Combine chickpeas, cucumber and black olives in a bowl and set aside.
  •  In a separate bowl, whisk together olive oil, vinegar, sugar, salt, pepper and Italian seasoning. Stir in parsley and pour over chickpea mixture.
  • Toss to coat and refrigerate until serving.

Notes

  1. If you don’t have apple cider vinegar, you can substitute white wine vinegar or red wine vinegar.
  2. Make sure you use fresh, crisp cucumbers.
  3. Mix it up with some of the options above.
  4. If you add a lot of additional options, you will probably need to double the marinade.
  5. You can eat this salad as soon as it is mixed together but for the best flavor, let it chill in the refrigerate for a few hours before enjoying.
Keyword chickpea cucumber salad

Filed Under: Gluten Free, Recipes, Salad, Side Dish, Vegan Tagged With: chickpea cucumber salad, gluten free

Lemon Coffee Cake

March 4, 2020 by KateMiller 3 Comments

Topped with streusel and icing, this flaky Lemon Coffee Cake is bursting with flavor. The lemon filling makes it memorable.

Lemon coffee cake with a close-up slice

Is there anything better than a nice big slice of coffee cake and a cup of coffee? Whether for breakfast or dessert, it’s by far one of my favorite culinary pairings.

I’ve been making homemade coffee cakes for years, but most of my recipes result in a final product with a more cake-like consistency instead of a flaky and tense texture like you’d get with a more traditional bakery coffee cake. However, after countless experiments and lots of trial and error, I’m thrilled to say that this recipe meets all of that traditional bakery-style coffee cake criteria!

How to make Lemon Coffee Cake

You might think that making homemade coffee cake requires hours of time, but that’s absolutely not the case. I’m proud to say that this recipe is very easy to put together. I wouldn’t necessarily call it “quick,” but I think you’ll be pleasantly surprised by how little time commitment is required.

There are four main components to this recipe – the batter, the filling, the streusel and the glaze. The filling is canned, so only the batter and toppings require any hands-on work for you.

To start, prepare the coffee cake batter by combining the dry ingredients and then stirring in the other ingredients. I highly recommend just stirring by hand to make the batter. Using a stand or hand-held mixer makes it too easy to over-mix, and you definitely don’t want that here.

Next, cut together the streusel ingredients. Set aside.

Once the streusel is done, you’re ready to assemble the coffee cake. Begin by greasing and lightly flour-ing a Springform Pan. Then pour half of the cake batter into the pan. Sprinkle half of the streusel on top, spread on the lemon filling, and then cover with the remaining half of the batter and streusel. Bake at 350 degrees for about an hour.

Once the coffee cake is done baking, let it sit in the Springform Pan for 10 minutes to cool. Then remove the pan and transfer the cake to a metal cooling rack.

Stir together the glaze ingredients while the cake cools. Drizzle on top and then let the cake cool completely.

If you are impatient (like me!) and decide to cut into your coffee cake before it’s completely cooled, the filling will be a bit gooey and runny. If you don’t mind that aesthetic, you’ll find the coffee cake tastes absolutely delicious that way. Otherwise, if you want the filling to firm up, make sure you let the coffee cake cool completely, at least an hour or two.

Can I use other filling flavors in this coffee cake recipe?

This is one recipe that’s truly versatile. Play around with the fillings and have fun with it! Try cherry pie filling, raspberry preserves, cinnamon apples and walnuts, chocolate chips, or anything else that you can dream up. I’ve yet to try a filling that wasn’t a hit with all of us!

Finished lemon coffee cake on a platter

Coffee cake tips

Here are a few tips to help you make this Lemon Coffee Cake a winner in your household, too.

  • If you are not a fan of coconut, you can replace it with sliced or slivered almonds for the streusel.
  • You can skip the glaze if you really want…although I don’t know why you would!
  • Make sure you let the coffee cake bake long enough. The top should be golden brown and dry. The standard “toothpick test” won’t really work because of the filling, so pay attention to the top.
  • Even with the streusel, filling and glaze, the finished coffee cake is not too sweet.
  • Make sure that you use regular vanilla yogurt (full-fat, low-fat and fat-free versions are all okay) and not Greek vanilla yogurt. The Greek yogurt is too heavy and dense and it will change the texture of the finished cake.
  • I highly recommend doubling the recipe and making two coffee cakes. The second one makes an amazingly impressive and well-received treat for family members, friends and neighbors.
  • I would imagine you could freeze the coffee cake, but I have never tried that myself. If you do, please let me know how it works for you.

Other lemon recipes to try

  • Mini Lemon Scones with Lemon Glaze

I hope you’ll try this Lemon Coffee Cake recipe today. I know you’ll love it if you do. It is:

  • Impressive-looking
  • Easy to put together
  • Bursting with flavor
  • Perfect for gift giving
  • Great with a cup of coffee
  • Customizable
  • Flaky
  • Not-too-sweet
  • & delicious
Slice of lemon coffee cake

Lemon Coffee Cake

Topped with streusel and icing, this flaky Lemon Coffee Cake is bursting with flavor. The lemon filling makes it memorable.
Print Recipe Pin Recipe
Prep Time 15 minutes mins
Cook Time 1 hour hr
Cooling Time 1 hour hr 10 minutes mins
Total Time 2 hours hrs 25 minutes mins
Course Breakfast
Cuisine American
Servings 8

Equipment

  • Springform Pan

Ingredients
  

For the Coffee Cake

  • 2 1/4 c. All-Purpose flour
  • 1 c. Sugar
  • 1/2 t. Baking powder
  • 1/2 t. Baking soda
  • 1/2 t. Salt
  • 3/4 c. Butter (softened)
  • 6 oz. Vanilla yogurt (NOT Greek yogurt. Full fat, low fat or fat free is fine.)
  • 1 T. Lemon juice
  • 1 T. Fresh lemon zest
  • 1 Egg
  • 1 c. Lemon curd or Lemon pie filling

For the Streusel

  • 1/2 c. All-Purpose flour
  • 1/3 c. Sugar
  • 3 T. Butter
  • 1/2 c. Shredded coconut

For the Glaze

  • 1/2 c. Powdered sugar
  • 1 t. Lemon juice
  • 1 t. Water

Instructions
 

For the coffee cake

  • In a large mixing bowl, combine flour, sugar, baking powder, baking soda and salt. Stir to combine. Add remaining ingredients, except lemon filling, and beat until well combined.

For the streusel

  • In a small bowl, combine flour and sugar. Cut in butter until crumbly. Stir in coconut.

To assemble

  • Butter and flour a Springform pan.
  • Spread 1/2  the cake batter into the bottom of the pan. Sprinkle on half of the streusel topping and spread on the lemon curd or filling, to within a 1/2 inch of the edges. Spoon on remaining dough and remaining streusel.
  • Bake at 350 degrees for 50 – 60 minutes, until golden brown and set. Let cool for at least 10 minutes. Remove sides of pan, glaze (see instructions below) and continue cooling on a wire rack.

For the glaze

  • While cake cools, stir together powdered sugar, lemon juice and water. Drizzle on top of coffee cake and let cool completely.

Filed Under: Breakfast, Recipes

Mini Lemon Scones with Lemon Glaze

March 4, 2020 by KateMiller 3 Comments

Traditional scone texture meets tarty goodness. Mini Lemon Scones with Lemon Glaze are an elegant treat that’s easy to make.

Jump to Recipe
Mini lemon scones with lemon glaze

Lemon flavors are always a winner in our house and the pop of flavor in these scones definitely does not disappoint! You’ll get tang in both the flaky scone itself as well as the simple (albeit non-traditional) drizzled glaze.

Although they look delicate and elegant, you’ll be surprised by how easily this recipe comes together. You’ll have a couple cookie sheets of mini scones ready to pop in the oven in just about 20 minutes.

How to make lemon scone bites

As with traditional scones, these mini lemon scones start with a basic pastry dough comprised primarily of flour, sugar and butter. The flavor gets elevated with the addition of both lemon zest and lemon juice added right to the dough.

Once the dough is assembled, it is kneaded briefly. You can proceed to roll it out and cut out your shapes right away, although I recommend letting the dough rest for at least 15 minutes first. This step isn’t necessary but it does make the dough easier to work with.

After that, you roll out the dough and cut or press out your shapes. I did both – I cut out small triangles by hand and also pressed out small circles with a shot glass. The triangles look more traditional but the circles are cute and easy to pop in your mouth. The choice is yours!

While the scones bake, whip together an easy lemon glaze of powdered sugar, lemon juice and lemon zest. After the scones have cooled, drizzle on the glaze and prepare your mouth for a tart, tangy-yet-sweet treat.

Mini lemon scones with glaze on cooling rack

How to store your freshly-baked scones

Scones are, by nature, a bit more delicate than other baked goods. Therefore, you’ll want to make sure you store them properly so that they don’t get soft and mushy (and lose their flaky, scone-goodness), before you get to enjoy them all. They might not last long enough to be stored, but just in case…

I recommend storing your cooled scones in either a glass dish (I like to use an 8×12 casserole pan) or plastic container with a layer of paper towel on the bottom. The paper towel helps to absorb any moisture. They will stay fresh and tasting almost like they just came out of the oven for 2 to 3 days with this method.

If you want to store your scones for a longer period of time, use the same method and then freeze. They will lose a bit of their traditional texture, but they’ll still taste very nearly fresh-baked, at least in my opinion. If you want to make sure that fresh texture lasts, freeze the scone bites before you bake them and then cook and glaze the desired amount whenever you want.

Glazed mini lemon scones

Can I substitute different flavors for the lemon?

You can absolutely play around with other flavors! Some other options to try include:

  • different citrus flavors (swap the lemon juice and zest for orange or lime juice and zest)
  • using vanilla or almond extract to replace all of the lemon
  • adding poppy seeds to the dough
  • use lemon in the scones themselves but then use vanilla, almond or raspberry extract to flavor the glaze

Can I make these lemon scones full-sized instead of bite-sized?

Yes, you can use this recipe to make full-sized scones instead of mini scones. To do that, just cut out full-sized triangle shapes and add about 3 to 5 minutes to the cook time. Instead of 2 dozen bites, you’ll get about 8 to 12 full-sized scones.

Other lemon recipes to try

Whether you make these scones for your family to enjoy, for company, or to take to a baby or wedding shower, I know you’ll love them. They are:

  • Sweet
  • Just the right amount of tart and tangy
  • Easy to make
  • Fun to eat
  • Elegant looking with being fussy
  • & delicious
Three Mini Lemon Scones with lemon glaze on bamboo mat

Mini Lemon Scones with Lemon Glaze

KateMiller
Traditional scone texture meets tarty goodness. Mini Lemon Scones with Lemon Glaze are an elegant treat that's easy to make.
5 from 1 vote
Print Recipe Pin Recipe
Prep Time 20 minutes mins
Cook Time 15 minutes mins
Optional Resting Time 15 minutes mins
Total Time 35 minutes mins
Course Dessert
Cuisine American
Servings 24 mini scones

Ingredients
  

For the Scones:

  • 2 c. Flour
  • 1/4 c. Sugar
  • 1 t. Baking Powder
  • 1 t. Baking Soda
  • 1/2 c. Butter (cut into small pieces)
  • 2 t. Lemon Zest (freshly grated)
  • 1/4 c. Lemon Juice (freshly squeezed)
  • 1/4 c. Milk

For the Glaze:

  • 1 c. Powdered Sugar
  • 2 t. Lemon Zest (freshly grated)
  • 1/4 c. Lemon Juice (freshly squeezed)

Instructions
 

For the Scones:

  • In a large bowl, combine flour, sugar, baking powder and baking soda. Cut the butter pieces into flour until small crumbs (about 1 minute).
  • Stir the lemon zest into the mixing bowl. Combine the lemon juice and milk and immediately pour into the mixing bowl. Stir until combined and work dough into a ball. Knead 8-10 times. *Optional: Let dough rest in the refrigerator for at least 15 minutes to make it easier to work with.
  • On a well floured surface, roll out dough until it is about a 1/2" thick. With a knife, cut the dough into small triangles. Or, using a shot glass or clean medicine cup, cut the dough into small circles. Place on a cookie sheet and bake at 350 degrees for 12-15 minutes, until lightly golden brown on top. Remove to a wire rack and cool completely.

For the Glaze:

  • In a small bowl, combine powdered sugar and lemon zest. Slowly add just enough lemon juice until you reach the desired consistency for a glaze.
  • Spoon glaze over the cooled mini scones and let dry. Enjoy!
Keyword mini lemon scones

Filed Under: Dessert, Recipes Tagged With: easy dessert recipe, lemon scones, mini lemon scones

Deconstructed Broccoli & Cheese Stuffed Chicken

February 18, 2020 by KateMiller Leave a Comment

Jump to Recipe

Get all of your favorite flavors from Broccoli & Cheese Stuffed Chicken in this low-fuss, easy deconstructed version. Comfort food, done right!

I’ve loved stuffed chicken breasts for as long as I can remember. Grabbing a variety of different ones from the frozen section at the grocery store creates a family-favorite dinner. However, they are definitely not the healthiest option!

Healthier & Easier in Casserole Form

Deconstructing the classic stuffed chicken breast to its core components creates a much easier and healthier homemade option. This casserole recipe relies on a homemade sauce cheese sauce and comes together with just about 10 minutes of prep work.

Serving of broccoli & cheese stuffed chicken casserole on a plate

Deconstructed Broccoli & Cheese Stuffed Chicken

Get all of your favorite flavors from Broccoli & Cheese Stuffed Chicken in this low-fuss, easy deconstructed version. Comfort food, done right!
Print Recipe Pin Recipe
Prep Time 15 minutes mins
Cook Time 40 minutes mins
Total Time 55 minutes mins
Course Main Course
Cuisine American
Servings 4

Ingredients
  

  • 1 pound Boneless, skinless chicken breasts
  • Salt & pepper (to taste)
  • 2 T. Butter
  • 2 T. Flour
  • 1 1/4 c. Milk
  • 1 1/2 c. Shredded cheddar cheese
  • 3 c. Frozen broccoli
  • 1 t. Salt
  • 1/2 t. Thyme
  • 1/2 t. Black pepper
  • 2 T. Butter
  • 1 c. Breadcrumbs

Instructions
 

  • Cut chicken into bite-sized cubes and season with salt and pepper, to taste. Place in a small casserole dish (8×8 or 9×9).
  • In a small saucepan, melt 2 T. butter over medium heat. Stir in flour and cook for 2 minutes, stirring frequently. Whisk in milk, bring to a boil and cook until thickened to gravy consistency.  Remove from heat. Stir in cheese until melted. Add the broccoli. Season with salt, pepper and thyme. Pour over chicken.
  • Bake at 350 degrees for 30 minutes.
  • Melt 2 T. butter and combine with breadcrumbs. Sprinkle over chicken and return to the oven. Bake for 5-10 minutes, or until browned and chicken is fully cooked.
Keyword broccoli and cheese stuffed chicken, casserole

Filed Under: Dinner, Recipes

  • « Go to Previous Page
  • Page 1
  • Interim pages omitted …
  • Page 4
  • Page 5
  • Page 6

Primary Sidebar

Hi! I’m Kate!

Welcome to Cooking During Stolen Moments. I share family-friendly, mostly from-scratch recipes that are as budget-friendly as they are delicious. Learn more about me...

Let’s Connect

  • facebook
  • twitter
  • instagram
  • pinterest

Popular Recipes

Glazed Blueberry Biscuits

Prepared portillo's chopped salad in a serving bowl

Portillo’s Chopped Salad Recipe

salad on a plate dressed with avocado lime ranch dressing

Avocado Lime Ranch Dressing

Slice of crustless coconut pie on a plate.

Crustless Coconut Pie

Copyright © 2025 Cooking During Stolen Moments on the Foodie Pro Theme