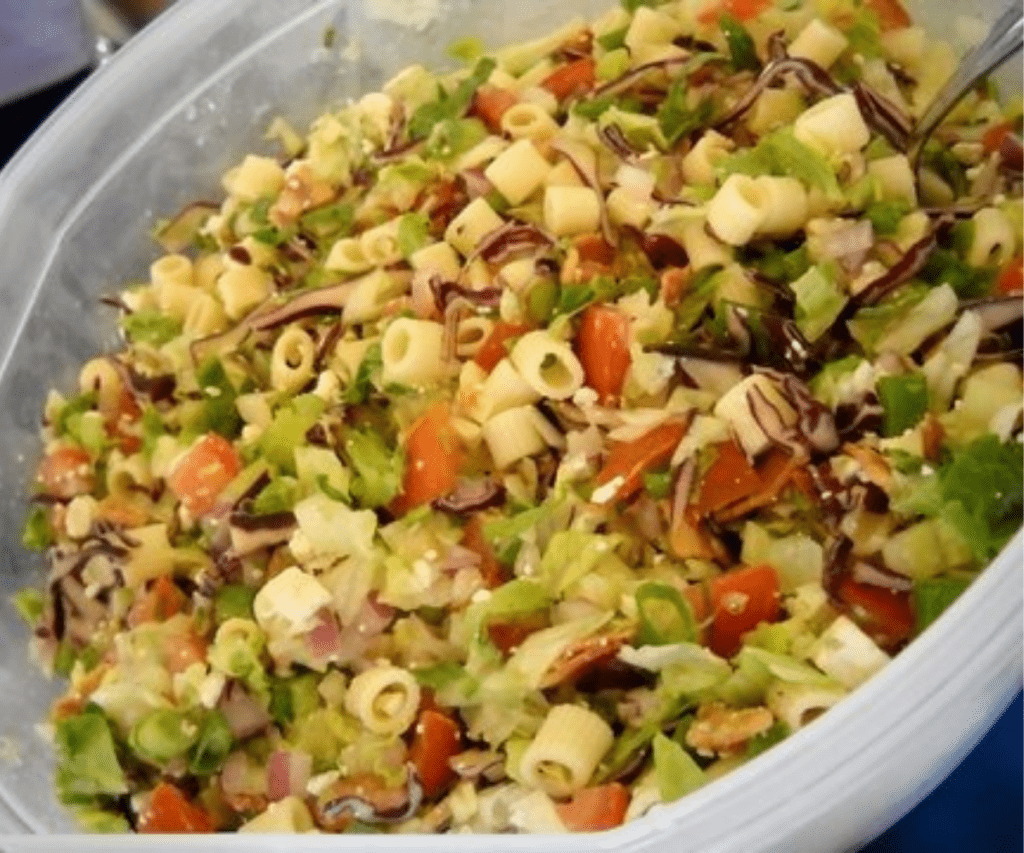
• Skip to primary navigation
  • Skip to main content
  • Skip to primary sidebar

Cooking During Stolen Moments

  • Home
  • About
    • Privacy Policy & Disclosures
  • Recipes
    • Breakfast
    • Dessert
    • Dinner
    • Gluten Free
    • Salad
    • Side Dish
    • Vegan
  • Navigation Menu: Social Icons

    • Home
    • About
      • Privacy Policy & Disclosures
    • Recipes
      • Breakfast
      • Dessert
      • Dinner
      • Gluten Free
      • Salad
      • Side Dish
      • Vegan

Pineapple Chicken

January 13, 2021 by Kate Miller Leave a Comment

Jump to Recipe
Serving of pineapple chicken on a plate

This easy Pineapple Chicken recipe is a healthier take-out alternative when you’re craving Chinese food. It’s delicious and comes together quickly.

Do you ever get a craving for Chinese food but just don’t feel like ordering take-out or waiting for delivery?

Fortunately, this recipe for Pineapple Chicken comes together quickly, requires minimal ingredients that you likely already have on hand, and it’s a delicious, lightened-up version of a traditional favorite.

Side dish ideas

A saucy dish like Pineapple Chicken is best served over or alongside white or brown rice. You could also serve over Lo-Mein or Udon noodles, if you’d prefer.

Add a frozen egg roll and/or a couple cream cheese wontons or crab rangoon and you’ve got a perfect meal that the whole family will love.

Can I make this recipe ahead of time?

Yes, you can absolutely make Pineapple Chicken in advance!

You can cook the chicken up to a 2 days ahead of time and then just make the sauce before serving.

If you know you’ll be in a rush at dinner time, you can prepare the full recipe up to a day or two in advance and then just reheat. If you do it this way, I recommend you store the chicken and veggies separate from the sauce. Also, it’s best to save the cornstarch step for just before serving, if at all possible.

Serving of pineapple chicken on a black plate

Pineapple Chicken

This easy Pineapple Chicken recipe is a healthier take-out alternative when you're craving Chinese food. It's delicious and comes together quickly.
Print Recipe Pin Recipe
Prep Time 10 mins
Cook Time 35 mins
Total Time 45 mins
Course Dinner
Servings 4

Ingredients
  

  • 2 tablespoons Olive oil
  • 1 pound boneless, skinless chicken breasts or thighs
  • 1 Green pepper (diced)
  • 1 Can pineapple chunks or tidbits (drained with 1/2 cup juice reserved)
  • 1 tablespoon Crushed red pepper flakes
  • 1/2 tablespoon Dried ginger (or 1 tablespoon freshly grated ginger)
  • 1/3 cup Teriyaki sauce
  • 1/3 cup Chicken stock
  • 1 tablespoon Cornstarch mixed with 1 tablespoon water

Instructions
 

  • In a large skillet, heat olive oil. Add chicken and brown on both sides, about 3-4 minutes each. Cover skillet and cook for 10 minutes more. (If chicken is not fully cooked all the way, that's okay. It will have a chance to finish cooking later.) Remove chicken from skillet and set aside.
  • Add diced green peppers, pineapple, crushed red pepper and ginger. Cook about 5 minutes. While cooking, cut the chicken into chunks.
  • Add reserved pineapple juice, teriyaki sauce and chicken stock. Bring to a boil, return chicken to skillet, reduce heat, cover and simmer for at least an additional 15 minutes or up to a few hours.
  • About 10 minutes before serving, remove cover from skillet and bring sauce back to a boil. Stir in cornstarch/water mixture and continue boiling until sauce is desired thickness.

Notes

  • You can make this dish vegetarian by swapping the chicken with tofu and the chicken stock with vegetable stock.
  • Add more red pepper flakes in you like it spicier.
Keyword Pineapple Chicken

Filed Under: Dinner, Recipes

Bacon, Cheese & Egg Biscuit Cups

January 12, 2021 by Kate Miller Leave a Comment

Jump to Recipe
Bacon, Cheese & Egg Biscuit Cups

Bacon, Cheese & Egg Biscuit Cups are a delicious breakfast or brunch option whether you want to impress guests or stock the freezer for the kids.

This recipe is sure to be a hit with everyone who tries them.

They are packed with everyone’s favorite breakfast flavors. Bacon. Cheese. Eggs. Biscuits. How could you go wrong?

Although they take a bit of extra work, I promise it is worth it.

Plus, the recipe makes two dozen biscuit cups, so there’s plenty to enjoy for the effort.

Can I freeze these biscuit cups?

Yes! This recipe freezes beautifully.

After baking, allow the Bacon, Cheese & Egg Biscuit Cups to cool completely. Then, remove from the muffin tins and place on a foil-lined cookie sheet.

Place the cookie sheet in the freezer and flash-freeze the biscuit cups for 1 hour.

After the hour is up, transfer the cups to a freezer bag or container.

To reheat, you can microwave the biscuit cups from frozen for about 45 seconds. Start there and add time, if needed, until heated through.

For best results, reheat your biscuit cups from frozen at 350 degrees for about 10-15 minutes, until heated through.

Bacon cheese and egg biscuit cups on a platter

Bacon, Cheese & Egg Biscuit Cups

Bacon, Cheese & Egg Biscuit Cups are a delicious breakfast or brunch option whether you want to impress guests or stock the freezer for the kids.
Print Recipe Pin Recipe
Prep Time 45 mins
Cook Time 15 mins
Total Time 1 hr
Course Breakfast
Cuisine American
Servings 24 biscuit cups

Ingredients
  

For Biscuit Dough

  • 2 1/2 cup Flour
  • 2 1/2 tablespoons Baking powder
  • 1/2 tablespoon Salt
  • 1 tablespoon Sugar
  • 1/2 cup Butter (cut into small pieces)
  • 1/2 cup Milk
  • 1 Egg (slightly beaten)

For Filling

  • 6 Eggs
  • 3 ounces Cream cheese
  • 1/2 cup Milk
  • 1 pound Bacon (cooked and crumbled)
  • 1 1/2 cup Shredded cheddar cheese
  • To taste: hot sauce, garlic powder, salt, pepper…or any other seasonings you'd like to add

Instructions
 

For Biscuit Dough

  • In a large bowl, whisk or sift together flour, baking powder, salt and sugar. Cut in butter until crumbly. Stir in milk and egg until dough comes together. Knead a few times by hand and set aside.

For Filling

  • Whisk eggs in a large bowl. Stir in cream cheese and milk until smooth. Add other ingredients and stir to combine.

To assemble

  • Using about 2 T. of biscuit dough at a time, press into the bottom, and 3/4 of the way up the sides, of lightly greased muffin tins. Pre-bake at 400 degrees for 3 minutes.
  • Pour 1/4 c. egg mixture into each pre-baked biscuit cup and bake for 12-15 minutes longer, until eggs are completely set and biscuit cups are slightly browned.

Notes

Recipe Tips:
  • You can make the bacon up to 2 days in advance.
  • Freeze the biscuit cups after baking and once cooled completely.
  • Reheat cups in the microwave or oven from frozen.

Filed Under: Uncategorized

Maple Oat Bread Recipe

November 7, 2020 by Kate Miller Leave a Comment

Maple Oat Bread is a delicious and hearty bread that makes a perfect accompaniment to soups, stews, or a holiday dinner. The hint of sweet maple adds an unforgettable flavor!

Sliced maple oat bread on a cutting board

Maple Oat Bread

Maple Oat Bread is a delicious and hearty bread that makes a perfect accompaniment to soups, stews, or a holiday dinner. The hint of sweet maple adds an unforgettable flavor!
Print Recipe Pin Recipe
Prep Time 15 mins
Cook Time 35 mins
Rising Time 45 mins
Total Time 1 hr 35 mins
Course Bread
Cuisine American

Ingredients
  

  • 1 cup Quick-cooking oats
  • 1 cup Boiling water
  • 1/3 cup Warm water
  • 1 Tablespoon Yeast
  • 1/2 cup Maple syrup
  • 2 teaspoons Olive or Canola oil
  • 1 teaspoon Salt
  • 3 1/2 – 4 cups Flour (White, whole wheat, or a combination of the two)
  • 1 Egg white
  • 2 Tablespoons Oats

Instructions
 

  • In a small bowl, combine oats and boiling water. Stir. Set aside to cool a little bit.
  • In a large bowl, dissolve the yeast in 1/3 c. warm water. Add maple syrup, oil, salt and oatmeal mixture. The oatmeal mixture should be warm but not hot. (If it’s too hot it will kill the yeast.) Stir to combine.
  • Work in as much flour as possible until dough is no longer sticky. Knead for 5-6 minutes.
  • Place dough back in bowl, cover and let rise for one hour.
  • After an hour, punch down dough, knead another 1-2 minutes, and place in a greased 8 or 9-inch cake or pie pan. Cover and let rise for 45 minutes.
  • Brush egg white on top of the bread and sprinkle with additional oats. Bake at 350 degrees for 30-35 minutes.

Notes

  • For a delicious topping, mix softened butter with a little maple syrup and a pinch of cinnamon. Stir together and spread on the bread.
  • This bread tastes amazing when served warm. Serve right after baking, warm slices briefly in the microwave, or toast individual slices in a toaster.
Keyword Maple Oat Bread

Filed Under: Breads, Recipes

Ground Beef Stew

November 7, 2020 by Kate Miller Leave a Comment

This thick and hearty Ground Beef Stew has all of the traditional stew flavors you love but you can have it on the table in half the time!

Ground beef stew in a white bowl.
Ground beef stew in a white bowl

Ground Beef Stew

This thick and hearty Ground Beef Stew has all of the traditional stew flavors you love but you can have it on the table in half the time!
Print Recipe Pin Recipe
Prep Time 10 mins
Cook Time 40 mins
Total Time 50 mins
Course Main Course
Cuisine American
Servings 4

Ingredients
  

  • 1 pound Ground beef
  • 1 Onion (diced)
  • 4 cloves Garlic (minced)
  • 1 teaspoon Salt
  • 1/2 teaspoon Black pepper
  • 1/4 teaspoon Crushed red pepper flakes
  • 3 cups Beef stock
  • 1 14.5-oz. Can diced tomatoes
  • 2 pounds Small yellow potatoes (quartered)
  • 2 cups Frozen mixed vegetables
  • 1 Tablespoon Italian seasoning
  • 1 6-oz. Can tomato paste

Instructions
 

  • In a stockpot or large saucepan, brown ground beef with onion and garlic. Season with salt, black pepper and crushed pepper flakes. Drain.
  • Add beef stock, can tomatoes, potatoes, mixed veggies and Italian seasoning. Bring to a boil, cover, reduce heat and simmer at least until potatoes are tender, about 30 minutes. (This can definitely be simmered all day or even put together in a crockpot for the whole day.)
  • About 10 minutes before serving, stir in tomato paste. Let simmer uncovered and serve.

Notes

  • The stew will seem more like soup before adding the tomato paste. The tomato paste will thicken it up to a familiar stew consistency. But if you’d prefer a simple soup dinner instead, just omit the tomato paste.
  • Ground beef stew freezes perfectly so consider doubling or even tripling the recipe and get a few nights’ worth of dinners at once.
Keyword Ground Beef Stew

Filed Under: Dinner, Recipes

Bacon and Cheese Muffins

October 29, 2020 by Kate Miller Leave a Comment

Bacon and Cheese Muffins are a delicious, savory make-ahead breakfast option that also do double duty as a snack or soup side. No matter the situation, you can’t go wrong with bacon and cheese!

Jump to Recipe
4 bacon and cheese muffins on a white plate.

Is there any better combination than bacon and cheese?

This muffin recipe is packed full of both!

So, ditch the sweet muffins for breakfast and give these savory Bacon and Cheese Muffins a try.

Why you’ll love these muffins

If your mornings are a rush to get everyone out of the door on their way to work or school, having a make-ahead breakfast on hand is a great option.

These muffins are perfect for making ahead, and the savory taste is a wonderful way to start the day.

You’ll also love the muffins as a snack or served with a bowl of soup. They have more of a biscuit texture than a cake texture which makes them perfect any time of day! Just warm in the microwave for about 15-20 seconds and spread on some butter for a tasty treat.

The recipe comes together very quickly. You can get this stirred up and baked in just over 30 minutes.

Additionally, this recipe makes about 20 muffins and the extra muffins freeze wonderfully. To reheat, defrost on the counter overnight (or for at least 2 hours) and then warm briefly in the microwave before eating.

Ingredients you need

You’ll be surprised by the amount of flavor you can get with just 8 ingredients!

For this recipe, here’s all that you need:

  • Bacon
  • Cheese
  • Eggs
  • Flour
  • Milk
  • Butter
  • Baking powder
  • Salt & pepper

See? So simple yet SO good!

Tips to make the best Bacon and Cheese Muffins

This recipe is really easy, but you do need to be careful of a few things.

Firstly, make sure that you cook the bacon so that it is extra crispy (but not burnt). If the bacon isn’t crispy, it will get a little “soggy” when baked in the muffins. And who wants soggy bacon?

Also, it’s important that you do not over-stir the batter. Just like regular biscuits, over-working the dough will cause the muffins to have a tougher texture.

Variations

You can take these muffins to the next level with one of the following variations or additions:

  • Stir some smoked paprika into the batter for an extra savory flavor.
  • Use pepper jack cheese instead of cheddar for a little kick.
  • Add some green onions to the batter.

If you come up with other variations, please let me know as I’m always looking for ways to mix things up!

Other recipes to try

  • Homemade Cinnamon Raisin Bread
  • Apple Spice Bars
  • Oatmeal Breakfast Bars
  • Peanut Butter & Jelly Breakfast Cookies
  • English Muffin Bread
4 bacon and cheese muffins on a white plate

Bacon and Cheese Muffins

Bacon and Cheese Muffins are a delicious, savory make-ahead breakfast option that also do double duty as a snack or soup side. No matter the situation, you can't go wrong with bacon and cheese!
Print Recipe Pin Recipe
Prep Time 10 mins
Cook Time 25 mins
Total Time 35 mins
Course Breakfast, Snack
Cuisine American
Servings 24 muffins (or so)

Ingredients
  

  • 4 cups Flour
  • 4 teaspoons Baking powder
  • 1/2 teaspoon Salt
  • 1/2 teaspoon Black pepper
  • 2 1/2 cups Milk
  • 1/2 cup Butter (melted and cooled)
  • 2 Eggs
  • 1 pound Bacon (diced and cooked crisp with grease drained)
  • 1 1/2 cup Shredded cheddar cheese

Instructions
 

  • Preheat oven to 400 degrees.
  • In a large mixing bowl, stir together flour, baking powder, salt and pepper. In a small bowl, mix together the milk, melted butter or margarine and eggs. Add the wet ingredients to the dry ingredients and stir just until moistened.
  • Fold in the bacon and cheese just until combined. Scoop into greased or lined muffin tins. Bake at 400 degrees for 20-25 minutes, until lightly golden brown.

Notes

  • Make sure you cook the bacon nice and crispy.
  • Do not over mix the batter.
  • Freeze for prolonged storage.
Keyword Bacon and Cheese Muffins

Filed Under: Breads, Breakfast, Recipes

Mac and Cheese Soup

October 29, 2020 by Kate Miller Leave a Comment

Warm and comforting Mac and Cheese Soup is a cheesy way to put a dinner on the table that the whole family will love. Leftovers are great for lunch, too!

Jump to Recipe
A serving of mac and cheese soup in a blue-handled bowl.

Have you been looking for a way to mix up your mac and cheese? Or maybe you’ve been looking for another soup to add to your regular repoitoire?

This is the soup for you!

Why you’ll love this recipe

This Mac and Cheese Soup recipe is a guaranteed winner! It’s overflowing with cheese and noodles, but it also has a healthy heaping of veggies thrown in to the mix for good measure.

It’s an easy dinner to throw together. You can get dinner on the table in just about 30 minutes, from start to finish.

Every mac and cheese fan will fall in love with their first bite. The soup tastes just like the classic dish, except you eat it with a spoon.

It makes plenty – enough for at least 8 servings – and the leftovers taste just as good as the original serving.

Ingredients you need

This soup requires a surprisingly few amount of ingredients. Here’s all you’ll need:

  • Stock (chicken or vegetable)
  • Onion, celery and carrots
  • Pasta
  • Shredded cheese
  • Milk
  • Butter
  • Cornstarch
  • Seasonings

That’s it! You likely even have everything you’ll need on hand already.

Tips to make the best Mac & Cheese Soup

This soup is so easy to put together that you really don’t have to worry too much about messing it up. But, there are a few things to keep in mind to make it the best that it can be!

Tip #1 – Use freshly shredded cheese instead of bagged shredded cheese. The freshly shredded cheese melts much more smoothly and helps to give the soup a silky consistency.

Tip #2 – Although I usually love one-pot soups where the noodles boil right in the broth, I don’t recommend that for this soup. It’s worth dirtying an extra pot to get the best consistency for both the soup and the noodles.

Tip #3 – Make sure you dissolve the cornstarch completely in the milk before you stir it into the soup. And when you do stir it in, pour it into the pot slowly and stir continuously. Both of these steps will prevent any clumps from forming.

Variations

There are all kinds of ways you can mix up the recipe for Mac and Cheese Soup! Have fun with and make it your own.

Here are a few ideas to get you started:

  • Top with cooked, crumbled bacon
  • Stir in lobster, cubed, cooked chicken or ham pieces
  • Add broccoli or cauliflower
  • Replace the pasta with potatoes
  • Use any shape of pasta that you’d like
  • Puree the veggies in the soup (with an immersion blender) before adding the pasta for a thick, chowder-y consistency
  • Use your favorite combination of cheeses

If you try any of these variations, or come up with one of your own, I would love to hear about it!

Other soup recipes to try

  • Ground Beef Stroganoff Soup
  • Loaded Baked Potato Soup
  • Cajun Chicken Noodle Soup
  • Butternut Squash Soup
  • Ground Beef & Barley Soup
  • Chicken Pot Pie Soup
Close up of mac and cheese soup on a spoon

Mac and Cheese Soup

Warm and comforting Mac and Cheese Soup is a cheesy way to put a dinner on the table that the whole family will love. Leftovers are great for lunch, too!
Print Recipe Pin Recipe
Prep Time 5 mins
Cook Time 25 mins
Total Time 30 mins
Course Soup
Cuisine American
Servings 8

Ingredients
  

  • 4 Tablespoons Butter
  • 1 medium Yellow onion (diced)
  • 4 stalks Celery (thinly sliced)
  • 3 Carrots (peeled and thinly sliced)
  • 1 1/2 teaspoon Salt
  • 1 teaspoon Paprika
  • 1/2 teaspoon Black pepper
  • 8 cups Chicken or vegetable stock
  • 4 cups Cooked pasta (shape of choice)
  • 1/4 cup Cornstarch
  • 1 1/2 cup Milk
  • 4 cups Freshly shredded cheese (Sharp cheddar, Colby Jack, Mild cheddar, or any other combination that you'd like)
  • Additional salt, pepper and paprika (to taste)

Instructions
 

  • Melt butter in a large pot. Add onions, celery and carrots. Season with salt, paprika and pepper and cook until onions are translucent, about 5 minutes. Pour in stock and bring to a slow boil.
  • Simmer soup for about 10 minutes, until carrots are tender, maintaining a low boil.
  • Completely dissolve cornstarch in milk and slowly pour and stir into soup.
  • Add cheese a little bit at a time, stirring after each addition, until completely melted.
  • Stir in cooked noodles. Season to taste with more salt, pepper and paprika. Serve and enjoy!

Notes

  • Use freshly shredded cheese for the best consistency.
  • Save any leftovers and enjoy for a delicious lunch the next day.
  • Make it the soup your own with add-ins such as crumbled bacon, lobster, cooked chicken or ham pieces.
Keyword Mac and Cheese Soup

Filed Under: Uncategorized

Apple Spice Cupcakes with Maple-Brown Sugar Frosting

October 8, 2020 by Kate Miller 1 Comment

Apple Spice Cupcakes are packed with fall flavors, including chunks of apples, and covered in a sweet, maple-infused frosting. The perfect Autumn dessert!

Jump to Recipe

These cupcakes are an awesome fall-time dessert and kids love them as an after school snack.

They are so packed with flavor that you’ll fall in love with your first bite. The sweet, creamy frosting adds some extra sweetness and serves as a nice counterbalance to the subtle spiciness of the cupcake itself.

One of my favorite aspects of this recipe for Apple Spice Cupcakes is that they smell absolutely AMAZING while they bake. If you are entertaining during the fall, I definitely recommend that you plan to make these as a dessert option, and plan to have them baking when the guests arrive. They love the inviting, tasty aroma as they walk in the door!

What spices are included in these cupcakes?

One of my kids used to always confuse “spice” with “spicy,” which made her hesitant to eat an apple spice cupcake initially. After all, who wants a spicy cupcake??

Rest assured, these are not that!

Instead, this recipe gets its spice from the traditional fall family of spices – cinnamon, nutmeg, ginger, and allspice. You’ll find these same flavors in Pumpkin Spice Lattes, pumpkin pie, apple pie, and so many other Autumn dishes.

Can I freeze Apple Spice Cupcakes or prep them ahead of time?

The short answer is – Yes, you can freeze apple spice cupcakes after you bake them.

The long answer is – You can, but I wouldn’t recommend it. I find that most cupcakes lose both some flavor and texture when they are frozen and then defrosted. These cupcakes are no different. If you are okay with that, go ahead and freeze them after they are cooled. You can frost them before freezing or after they’ve been thawed.

If you’d like to make them ahead of time, they’ll stay fresh and moist up to 3 days after baking.

You can also prepare both the batter and frosting up to 3 days in advance and then just bake and frost when you need them.

A quick note on baking

These cupcakes are a bit stickier than traditional cupcakes, so make sure that you grease AND flour your muffin tins, or use muffin liners, so that the bottoms to not stick to the pan.

A line of apple spice cupcakes with maple-brown sugar frosting on a polka-dot placemat.

Apple Spice Cupcakes with Maple-Brown Sugar Frosting

Apple Spice Cupcakes are packed with fall flavors, including chunks of apples, and covered in a sweet, maple-infused frosting. The perfect Autumn dessert!
Print Recipe Pin Recipe
Prep Time 15 mins
Cook Time 25 mins
Total Time 40 mins
Course Dessert, Snack
Cuisine American
Servings 12 cupcakes

Ingredients
  

For the Cupcakes:

  • 1 1/3 cup Vegetable oil
  • 2 cups Sugar
  • 3 Eggs
  • 1 teaspoon Vanilla
  • 3 cups Flour
  • 2 teaspoons Cinnamon
  • 1 teaspoon Baking soda
  • 1/2 teaspoon Salt
  • 1/2 teaspoon Nutmeg
  • 1/2 teaspoon Ginger
  • 1/4 teaspoon Allspice
  • 2 Apples (peeled and diced)

For the Maple-Brown Sugar Frosting

  • 4 ounces Cream cheese (softened)
  • 2 cups Powdered sugar
  • 1/4 cup Brown sugar
  • 2 Tablespoons Maple syrup
  • 1/2 teaspoon Maple extract (optional)

Instructions
 

For the Cupcakes:

  • Prep your muffin tin by greasing and flouring each cup, or inserting muffin liners. Preheat oven to 350 degrees.
  • In a large mixing bowl, combine oil, sugar, eggs and vanilla on high speed for 2 minutes, or by hand for 5 minutes.
  • In a separate bowl, whisk together flour, cinnamon, baking soda, salt, nutmeg, ginger and allspice until combined. Slowly add to mixing bowl and stir just until combined. Fold in apples. 
  • Pour into prepared muffin tins and bake at 350 degrees for 20-25 minutes, until they pass the toothpick test. Cool completely before frosting.

For the Maple-Brown Sugar Frosting

  • Combine all ingredients and beat until desired frosting consistency.

Notes

  • You can freeze these after baking, but I do not recommend it as they lose something in both taste and texture.
  • Make sure you grease and flour your muffin tins well, or use a muffin liner. These cupcakes tend to be stickier than normal cupcakes.
  • Feel free to experiment with the spice amount. Use less for a more subtle spice flavor; use more for a more robust flavor.
Keyword Apple Spice Cupcakes

Filed Under: Dessert, Recipes

Apple Spice Bars

September 6, 2020 by Kate Miller Leave a Comment

Packed with the flavors of Fall, Apple Spice Bars make a perfect treat as a snack, dessert or even breakfast! Plus, they’re the perfect Pumpkin Spice Latte accompaniment.

Jump to Recipe

If you want to make your house smell like fall, just throw a batch of these Apple Spice Bars in the oven. And then, when you’re ready for a taste of fall, take a bite and you’ll instantly be transported.

How do I make Apple Spice Bars?

This recipe does require a little effort in the form of peeling and cutting a few apples, but it is so worth it!

The base of this recipe is similar to many other baked goods – you begin by combining butter and sugar until creamy. Then you add eggs, vanilla, flour and oats to create a hearty batter. Added spices – cinnamon, cocoa powder, nutmeg and allspice – provide that unique “spicy” fallish flavor to the batter.

Then, you stir in chopped apples and walnuts and really create the full fall flavor. Additionally, the apples and walnuts give the bars an awesome crunch and texture that really set them apart from other baked goods.

You can’t go wrong with this recipe!

Can I freeze the bars?

These bars freeze beautifully and I highly recommend you double or even triple the recipe when you have an abundance of apples.

To freeze, I like to bake and then fully cool the bars. Then I cut them into individual-sized helpings and place on a cookie sheet. I toss the cookie sheet into the freezer for 15 to 30 minutes to flash freeze.

Next, I wrap the flash-frozen bars individually in waxed paper and place in gallon sized freezer bags. They’ll stay good in the freezer without losing any quality or taste for about 6 months.

To defrost, I just pull out the number of bars we want, put them on a plate, and let them sit on the counter for about an hour before digging in.

Apple Spice Bars

Packed with the flavors of Fall, Apple Spice Bars make a perfect treat as a snack, dessert or even breakfast! Plus, they're the perfect Pumpkin Spice Latte accompaniment.
Print Recipe Pin Recipe
Prep Time 30 mins
Cook Time 30 mins
Total Time 1 hr
Course Breakfast, Dessert, Snack
Cuisine American
Servings 12 bars

Ingredients
  

  • 1/2 cup Butter (softened)
  • 1/2 cup Brown sugar
  • 1/2 cup Sugar
  • 2 Eggs
  • 1 teaspoon Vanilla
  • 1 cup Flour
  • 1 cup Oats (old-fashioned or quick-cooking, depending on which texture you prefer)
  • 1 Tablespoon Cocoa powder
  • 1 teaspoon Baking powder
  • 1 teaspoon Cinnamon
  • 1/2 teaspoon Baking soda
  • 1/2 teaspoon Salt
  • 1/2 teaspoon Nutmeg
  • 1/8 teaspoon Allspice
  • 2 cups Peeled apple cubes
  • 1/2 cup Walnuts (chopped)
  • 1 teaspoon Lemon juice
  • Powdered sugar for garnish (optional)

Instructions
 

  • Beat the butter with the sugars until creamy. Add the eggs and vanilla and beat until well combined.
  • In a separate bowl, combine the remaining ingredients, except the apples and walnuts. Stir well and add to the mixing bowl. Beat just until combined.
  • Combine the apples and walnuts and toss with the lemon juice.
  • Fold the apple-walnut mixture into the mixing bowl. Spread into a greased 13×9 casserole dish.
  • Bake at 350 degrees for 25-30 minutes, until a toothpick inserted in the center comes out clean.
  • Cool completely and cut into bars. Dust bars with powdered sugar, if desired.

Notes

  • I prefer to use green apples in this recipe, but have successfully used many different varieties of both red and green apples over the years. Feel free to use your favorites or whatever you have on hand.
  • For an awesome dessert option, warm an apple spice bar for a few seconds in the microwave and top with some whipped cream or vanilla ice cream. Lightly drizzle on some caramel and enjoy!
Keyword Apple Spice Bars

Filed Under: Dessert, Recipes

Ground Beef Stroganoff Soup

September 6, 2020 by Kate Miller Leave a Comment

Ground Beef Stroganoff Soup combines all of the stroganoff flavors you love into a thick and hearty soup the whole family will enjoy.

Jump to Recipe

This thick and comforting soup will warm you up on the chilliest of days. But don’t stop there – you can absolutely enjoy this soup any time of year!

How to Make Ground Beef Stroganoff Soup

A rich beef broth combined with the creamy, silkiness of sour cream gives this soup the familiar texture and flavor of beef stroganoff, yet it doesn’t involve any labor intensive work or extra time in the kitchen. In fact, this soup comes together in just under 45 minutes.

The soup is packed with ground beef, mushrooms, carrots and noodles. It makes a complete meal on its own, or with a side salad or freshly baked bread or rolls.

Although the soup start off with a thinner beef stock base, the addition of sour cream combined with some cornstarch really thickens it up and adds a great depth of flavor.

Egg noodles are the ideal add-in noodle for this soup, but feel free to use whatever you have on hand. As you can see in the picture, I substituted bow ties because that was what I had available.

A white bowl filled with a serving of ground beef stroganoff soup

Ground Beef Stroganoff Soup

Ground Beef Stroganoff Soup combines all of the stroganoff flavors you love into a thick and hearty soup the whole family will enjoy.
Print Recipe Pin Recipe
Prep Time 15 mins
Cook Time 30 mins
Total Time 45 mins
Course Main Course, Soup
Cuisine American
Servings 6

Ingredients
  

  • 1 pound Ground Beef
  • 2 Tablespoons Butter
  • 1 Onion (diced)
  • 2 cloves Garlic (minced)
  • 1/2 pound Mushrooms (sliced)
  • 1 teaspoon Salt
  • 1/2 teaspoon Black pepper
  • 1/2 teaspoon Thyme
  • 1/2 pound Baby carrots
  • 8 cups Beef stock
  • 3 Tablespoons Corn starch
  • 1/4 cup Water
  • 1 cup Sour cream
  • 1/2 pound Cooked noodles (Egg noodles are best, but any kind will do)

Instructions
 

  • In a large pot, brown ground beef with butter, onions and garlic over medium-high heat. Cook until beef is browned completely. Add mushrooms and continue cooking until browned.
  • Season with salt, pepper and thyme. Stir in baby carrots and beef stock. Bring to a boil and then reduce heat to low and simmer until carrots are tender, at least 20 minutes. (You can let the soup slowly simmer for several hours at this point, if you want.)
  • Bring the soup back to a slow boil. Combine corn starch and water until smooth; slowly stir into soup. Let soup boil until thickened, about 5 minutes.
  • Stir in sour cream and cooked noodles. Season with additional salt and pepper, if needed. Serve immediately and enjoy.

Notes

  • The longer you let the soup simmer, the richer the flavors will become. However, if you’re in a big hurry, you can cut the simmer stage down to just 10 minutes by slicing the carrots before adding them to the soup.
  • If you want to make this a one-pot soup, you can cook the noodles along with the soup during step 2. To do this, you will need to add 2 additional cups of beef stock or water.
Keyword Ground Beef Stroganoff Soup

Filed Under: Recipes, Soup

Melon Salad with Mint

July 23, 2020 by Kate Miller Leave a Comment

Melon Salad with Mint elevates traditional fruit salad with a gourmet spin. Perfect for entertaining or when you just want something different!

Jump to Recipe
Metal serving bowl filled with melon salad with mint

This recipe is awesome any time of year, but it’s especially great in the summertime when fresh melon is in season. It’s loved by adults and kids alike.

How to make Melon Salad with Mint

It doesn’t get much easier than this recipe! The most time-intensive aspect is the time it takes to ball the melons. But once that’s done, you can toss it all together in less than five minutes.

The mint dressing is what makes this salad stand out. It’s a simple mixture of fresh mint, sugar, lime juice and water. Fresh mint is crucial to the dressing – dried mint will alter the taste and the texture.

Since mint is usually one of the more expensive fresh herbs, you can make a few extra batches of this dressing and freeze for use in future salads. Or, freeze the mixture in ice cube trays and add to a glass of water or other drink for a special treat.

Tips for choosing perfect melons

This salad relies on ripe, delicious melon – specifically cantaloupe, honeydew and watermelon.

Choosing a perfect melon from the grocery store isn’t always easy though. Follow these tips to help increase your chances of success.

  1. Make sure the melon doesn’t have any soft spots, cracks, bruises or other defects.
  2. The outside of ripe honeydews and melon will be dull. Avoid ones that are shiny as those are underripe. Cantaloupes should have a gold or orange color instead of a green or white color.
  3. Pick melons that are heavy for their size.
  4. When selecting a watermelon, give it a thump with your hand and choose one that sounds hollow.
  5. For cantaloupes and honeydews, sniff the spot where the melon was attached to the vine and select ones that smell fresh and somewhat sweet.

Do I have to make this salad in advance?

I definitely recommend that you make this salad ahead of time and let the flavors mature for at least 3 to 4 hours before serving. However, if you are really pressed for time, you can serve immediately after tossing it all together.

Metal serving bowl filled with melon salad with mint

Melon Salad with Mint

Melon Salad with Mint elevates traditional fruit salad with a gourmet spin. Perfect for entertaining or when you just want something different!
Print Recipe Pin Recipe
Prep Time 20 mins
Total Time 20 mins
Course Salad
Cuisine American
Servings 8

Ingredients
  

  • 2 Tablespoons Fresh mint chopped
  • 1/4 cup Sugar
  • 1 large Lime juiced and zested
  • 1/4 cup Water
  • 1 Cantaloupe
  • 1 Honeydew melon
  • 1/2 Watermelon

Instructions
 

  • In a large bowl, whisk together the mint, sugar, lime zest, lime juice and water.
  • Cut melons into cubes or into balls with a melon baller. Add to the bowl and toss to combine well.
  • Cover and refrigerate at least 3-4 hours to allow the flavors to combine.

Notes

  • Only use fresh mint. Dried mint will alter the taste and texture.
Keyword Melon Salad with Mint

Filed Under: Recipes, Salad

  • Go to page 1
  • Go to page 2
  • Go to page 3
  • Go to page 4
  • Go to Next Page »

Primary Sidebar

Hi! I’m Kate!

Welcome to Cooking During Stolen Moments. I share family-friendly, mostly from-scratch recipes that are as budget-friendly as they are delicious. Learn more about me...

Let’s Connect

  • facebook
  • twitter
  • instagram
  • pinterest

Popular Recipes

Serving of pineapple chicken on a black plate

Pineapple Chicken

Bacon cheese and egg biscuit cups on a platter

Bacon, Cheese & Egg Biscuit Cups

Loaf and slices of maple oat bread on white board

Maple Oat Bread Recipe

Ground beef stew in a white bowl

Ground Beef Stew

Copyright © 2021 Cooking During Stolen Moments on the Foodie Pro Theme