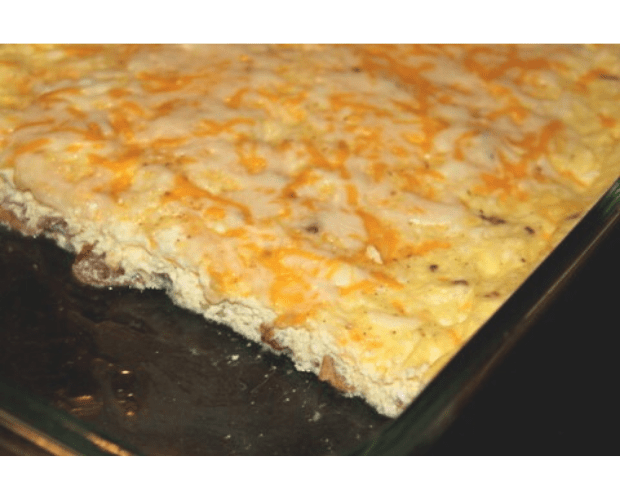
Whip up some Baked Eggs with Bacon & Cheese and enjoy for breakfast all week long. Use them as sandwich filling or on their own; you can’t go wrong no matter what you choose!

I love making a batch of these Baked Eggs with Bacon & Cheese over the weekend so that the kids can eat them in the morning during the school week.
The simplicity of ingredients combined with an easy, user-friendly baking method makes this recipe a winner!
How to make Baked Eggs with Bacon & Cheese
It really doesn’t get much easier than this recipe!
Eggs, milk, bacon, cheese and some seasonings are all you need to whip up a hearty breakfast option. Perfect for meal prepping on a weekend.
To make these baked eggs, you start with 8 eggs and 1 1/2 cup milk. The amount of milk might seem like a lot, but it’s an important piece of the puzzle that allows you to add the bacon and cheese, and to bake the eggs in the oven, without losing anything in the way of texture.
Then, you stir in a pound of cooked, crumbled and cooled bacon. (Cooling the bacon is a very important step as well. If you stir in hot or even warm bacon, the eggs will start to cook before you pour them into the casserole dish. You don’t want that!)
Next, you add the cheese and seasonings and stir to combine well.
Pour the whole mixture into a greased 13×9 casserole dish and bake in a preheated 350 degree oven for 30-35 minutes, until set. Top with some additional sprinkled cheese, if desired, and let the baked eggs sit for about 5 minutes before slicing.
I really like these eggs because they are fluffy and creamy without drying out as they would in the microwave. They also don’t get that funky texture that scrambled eggs can get when frozen.
How do I serve or eat the baked eggs?
You can use a slice of baked eggs on a bagel, English muffin, biscuit or toast to make an easy and delicious breakfast sandwich.
Or, cut a larger slice of baked eggs into thin slices and roll up in a tortilla with some salsa, avocado slices, and any other veggies you’d like for an amazing breakfast burrito!
You can also eat them by the slice, as-is, alongside a piece of toast, some hash browns, and/or fruit. Talk about a perfect, 5-minute breakfast.
Whatever option you go for, you really can’t go wrong!
Can I freeze baked eggs?
Yes, you sure can!
That’s one of the reasons why I love this recipe so much. Besides the awesome versatility, the eggs are perfect to prep ahead of time.
They’ll stay good in the fridge for 2-3 days, and for up to 3 months in the freezer.
To freeze, you can slice and wrap the egg slices individually or prepare a sandwich and then freeze.
Freezing baked egg slices:
- Make sure the eggs are completely cooled.
- Place an individual slice on a large piece of waxed paper or freezer paper and wrap to cover.
- Stack the individual slices into a large freezer bag or container, or freeze in individual sandwich-sized freezer bags.
- To use from frozen: unwrap egg, cover with a damp paper towel (optional) and microwave for 30-60 seconds, until warm. Serve as desired.

Freezing baked egg sandwiches:
- Prep your sandwich using any “base” you’d like. Some options to consider: bagel, English muffin, pancakes, thick-sliced sourdough, biscuit, etc.
- Place a slice of baked eggs into your sandwich base and add any other freezer-friendly toppings you’d like, such as additional cheese, green onions, and/or pepper slices.
- Wrap each sandwich individually in waxed paper or freezer paper and then place in the large freezer bag or container, or in individual sandwich-sized freezer bags.
- To reheat: unwrap the sandwich and wrap with a paper towel. Place on a microwave-safe plate and cook for 1-2 minutes, until warmed and heated through. Enjoy!
What else can I add to Baked Eggs?
This recipe is wonderfully versatile and once you’ve got the method down, you can change it up all kinds of ways!
Here are just a few of my tried-and-tested ideas:
- Swap the bacon with crumbled breakfast sausage, sliced Polish sausage, or diced ham
- Leave out the meat all together and add some more cheese
- Before baking, stir in some sliced green onions, or cooked and cooled veggies, such as peppers, onions, mushrooms, and spinach
- Put a layer of frozen diced potatoes or hash browns on the bottom of the greased casserole dish and pour the mixture on top
There’s all kind of ways you can mix this recipe up, so have fun with it!

Baked Eggs with Bacon & Cheese
Ingredients
- 8 Eggs
- 1 1/2 cup Milk
- 1 pound Diced bacon (cooked and cooled)
- 1 cup Shredded cheese
- 1 tablespoon Salt
- 1/2 tablespoon Black pepper
- 1/2 tablespoon Paprika
- Cooking spray
- Additional shredded cheese (if desired)
Instructions
- In a large bowl, whisk together eggs and milk until foamy. Stir in bacon, cheese and seasonings.
- Grease a 13×9 casserole dish with cooking spray. Pour in egg mixture. Bake at 350 degrees for 30-35 minutes, until eggs are fully cooked. Sprinkle with additional cheese, if desired, and return to the oven for a few minutes, just to melt the cheese.
- Cut baked eggs into squares, strips or circles with a biscuit cutter or glass, depending on how you plan to use them, and enjoy!
Notes
- Use slices of baked eggs for a breakfast sandwich filling or eat them as-is
- Switch up the meats for a fresh experience
- Add some cooked and cooled veggies (such as mushrooms, peppers and onions) for a heartier option
- Freeze slices individually or in their sandwich form by wrapping individually in waxed paper or freezer paper
Other recipes you might enjoy: