• Skip to main content
  • Skip to primary sidebar

Cooking During Stolen Moments

  • Home
  • About
    • Privacy Policy & Disclosures
  • Recipes
    • Breakfast
    • Dessert
    • Dinner
    • Gluten Free
    • Salad
    • Side Dish
    • Vegan

Cheesy Egg & Rice Bake

July 27, 2021 by KateMiller 2 Comments

With a blend of spices and cheese, this cheesy egg and rice bake makes a savory addition to any meal.  It is sure to become a family favorite.

Jump to Recipe

Only a few ingredients, that you likely already have on hand are required for this cheesy egg and rice bake that comes together quickly. 

It is a great way to use up leftover rice from last night’s dinner. The ease of preparation, combined with its delicious taste will make this an addition to you meal planning rotation this is frequently reached for.

The versatility of this dish makes it a savory option anytime of the day.  It makes a great egg and rice breakfast, that is filling and perfect for those mornings where you are short on time. 

It can be prepared the night before and just put in the oven in the morning. When you are finished getting ready, your breakfast will also be ready, giving you a great start to your day.

On a busy weeknight, this dish can be served along with our chicken with brown butter and capers and a salad, for a delicious and complete meal.  It is a great option to serve a large group and is a crowd-pleasing recipe for any brunch menu. 

Vegetarians will love this cheesy egg and rice bake, as it provides them with a meat-free meal that is packed with protein. 

HOW TO MAKE CHEESY EGG AND RICE BAKE

This recipe needs only a few basic ingredients that are staples in any kitchen.  Plan ahead to have leftover rice and you are good to go.

The ingredients are:

  • Eggs
  • Milk
  • Salt
  • Paprika
  • Black pepper
  • Ground cumin
  • Cooked rice
  • Green onions
  • Shredded cheese

Combine the eggs, milk, and seasonings in a large bowl.  Whisk them well, to ensure they are completely mixed together. 

Add the cooked rice, green onions, and 1 ½ cups of the shredded cheese, reserve ½ of cheese for later use. 

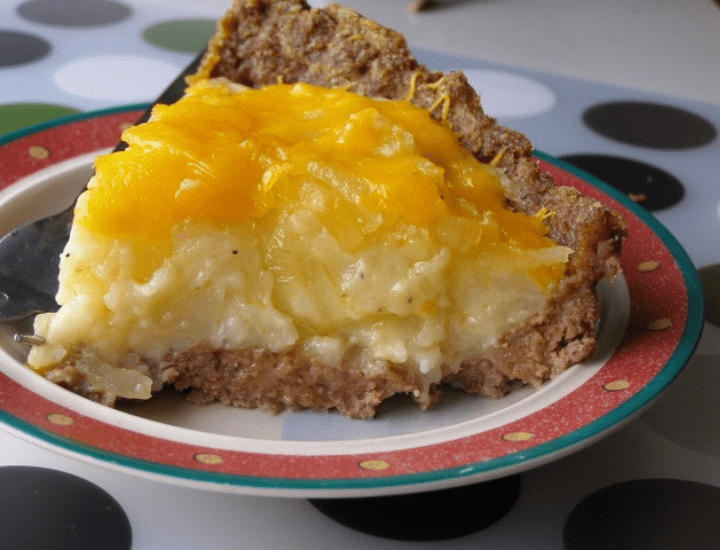
Stir everything together and pour it into a greased baking dish.  Sprinkle the remaining cheese on top of the mixture and place it in the oven. 

Bake it for 40-50 minutes at 375 degrees or until a knife inserted into the center comes out clean.  Let stand 5 minutes before slicing and serving.

Tip:  Make sure the rice you use is cold, otherwise you risk scrambling the eggs.  Plan to leave enough time for the rice to cool down or even better use up leftover rice.

HOW CAN THIS RECIPE BE CUSTOMIZED?

This cheesy egg and rice bake is incredibly versatile and can easily be customized to please any palate.

  • Pack in the veggies: Add some veggies, green pepper, red pepper, mushrooms, green peas, broccoli, chopped asparagus, anything work will work.
  • Up the protein and turn this into an all-in-one meal: Throw in some diced ham, cooked and crumbled breakfast sausage, diced bacon, etc.
  • Swap out the cheese:  Do not be afraid to experiment and try other kinds of cheese. I have found goat cheese to be amazing in this recipe.
  • Kick things up a notch: Make a Mexican version by incorporating some of your favorite toppings for tacos, such as black beans, green pepper and diced green chilies.  You can even top it with salsa and sliced avocados for a real treat!

FAQS

Can this cheesy egg and rice bake be frozen?

Yes!  This makes an excellent freezer meal!  You can prepare and mix all the ingredients to the point of baking. When it is ready to be baked, you can either place it in a casserole dish (aluminum foil pans are great for this) or pour it into a freezer bag. 

If you choose to freeze it in a bag, top it with cheese when you are ready to bake it.  To save yourself some time and clean up, you can make a double batch of this and bake one for immediate use and freeze the other.

Do I have to do anything special if I freeze it?

When you are ready to bake this dish, remove it from the freezer and allow it to completely thaw. 

If you are going to serve this for an egg and rice breakfast, pull it out the night before and let it defrost overnight in the fridge.  All you will have to in the morning is sprinkle a bit of additional cheese on it and pop it in the oven.

Can you make this low carb?

Yes, you can.  Use cauliflower rice in place of regular rice.  This makes this dish even healthier by taking advantage of all the health benefits and nutrients that cauliflower offers.

Slices of cheesy egg and rice bake on a cream colored plate

Cheesy Egg & Rice Bake

With a blend of spices and cheese, this cheesy egg and rice bake makes a savory addition to any meal.  It is sure to become a family favorite.
Print Recipe Pin Recipe
Prep Time 10 minutes mins
Cook Time 50 minutes mins
Total Time 1 hour hr
Course Breakfast, Side Dish
Cuisine American
Servings 8

Ingredients
  

  • 5 Eggs
  • 1 1/2 cup Milk
  • 1 teaspoon Salt
  • 1 teaspoon Paprika
  • 1/2 teaspoon Black pepper
  • 1/4 teaspoon Ground cumin
  • 3 cups Cooked rice
  • 1/4 cup Sliced green onions
  • 2 cups Shredded cheese (divided)

Instructions
 

  • Whisk together the eggs, milk and seasonings in a large bowl. Stir in rice, green onions and 1 1/2 c. shredded cheese. Pour into a greased 13×9 baking dish.
  • Top with remaining shredded cheese and bake at 375 degrees for 40-50 minutes, until set and a knife inserted in the center comes out clean. Let sit for 5 minutes before slicing and serving.

Notes

  • This recipe works best with leftover rice, so make extras and save to make this dish the next day.
  • Have fun with the mix-ins – add veggies, meats and other cheeses. The sky’s the limit!
Keyword Cheesy Egg and Rice Bake

Filed Under: Breakfast, Gluten Free, Side Dish

Blueberry Coffee Cake

March 28, 2021 by KateMiller Leave a Comment

Blueberry Coffee Cake is a delicious breakfast option that your whole family will love. It’s perfect for entertaining and even makes a tasty snack or dessert.

Jump to Recipe

Whether you call this recipe a coffee cake or a Blueberry Breakfast Cake, one thing is for certain – you’ll fall in love! From the moist and cake-y base to the tartness of the blueberries and the sweet crumble-like topping, there isn’t much missing from this tasty breakfast option.

It is a perfect brunch addition when entertaining (serve it alongside Lemon Coffee Cake for a great variety). Or, make it over the weekend for the family to enjoy for breakfast all week long – if you can get it to last that long! It goes pretty quickly around our house.

The texture and sweetness also make this recipe a hit at snack time or even for dessert.

How to make Blueberry Coffee Cake

Just 8 ingredients are all it takes to whip up this breakfast cake in a hurry. As long as you have some blueberries (either fresh or frozen), you likely already have everything else that you need on hand.

The ingredient list is very simple:

  • Flour
  • Sugar
  • Butter or margarine
  • Baking powder
  • Eggs 
  • Milk
  • Vanilla extract
  • Fresh or frozen Blueberries

That’s it! It really couldn’t get much easier.

The recipe starts with preparing the cake batter.

The process for this batter is more similar to a biscuit recipe than a cookie recipe since it begins with cutting butter into the flour and sugar, instead of creaming the butter with sugar and eggs. The reason for this process is so that you can set aside some of the flour, sugar and butter mixture to use for the topping.

After you’ve cut the butter into the flour and sugar, and reserved 3/4 cup for the topping, you’ll add the baking powder, yolks from two eggs (reserve the whites for the next step), milk and vanilla extract. Then you’ll blend together for about 1 minute.

Next, take the reserved egg whites and whip until soft peaks form. You can test for a “soft peak” by placing the back of a spoon on top of the egg whites and pulling upwards. If the egg whites peak up and flop over, you’ll know you have a soft peak. (Check out this great visual guide to egg peaks.)

Gently fold the egg whites into the cake batter and then pour the batter into a greased 13×9 casserole dish.

Sprinkle the blueberries over the batter in the dish and cover with the reserved crumb mixture. Bake at 350 degrees for 35 to 40 minutes, until fully cooked and lightly golden brown on top.

How can I customize this recipe?

Blueberry breakfast cake lends itself to a variety of customization options.

I’ve had found experimenting with a variety of changes and additions over the years.

Here are some tried-and-tested options you can try:

  • Replace the vanilla extract with almond extract and add some slivered almonds into the reserved crumb mixture.
  • Add a few dashes of cinnamon to the flour and sugar before you cut in the butter.
  • Replace the vanilla extract with 2 tablespoons of freshly squeezed lemon juice and mix some fresh lemon zest into the reserved crumb mixture.
  • Swap the blueberries with fresh or frozen raspberries or strawberries.
  • Drizzle a powdered sugar glaze on top after the coffee cake bakes. Flavor with a bit of vanilla extract, almond extract or lemon juice, depending on which one you use for the rest of the recipe.

FAQs

Can I freeze blueberry coffee cake?

This coffee cake does freeze really well, but there are a few tricks to keep in mind.

I’ve found that smaller coffee cakes taste better after being frozen, so if I’m making this recipe ahead, I’ll split the batter into 2 8-inch round cake pans and bake individually instead of in the larger casserole. You could also just cut it in half and freeze in smaller sections if you’d rather use the casserole dish.

To freeze, let your coffee cake cool completely and then carefully remove from the baking pan. Loosely wrap in freezer paper and then either tightly (but gently) wrap in a double-layer of plastic wrap or place in a gallon-sized freezer bag.

To serve from frozen, let the coffee cake defrost on the counter for at least 4 hours, until room temperature. Enjoy!

Is there a difference between using frozen or fresh blueberries?

I personally haven’t noticed a difference at all. Once baked, they both have a very similar taste and texture. The frozen blueberries tend to be a little smaller than fresh, but that’s really the only difference I think you’ll notice.

Can I make this recipe gluten free?

Although I have not done it personally, I’ve had several people tell me that they’ve made it successfully with gluten free flour blends. If you try it out, I’d love to hear how it turns out for you as well as what type of flour you use!

Can I make this recipe vegan?

Due to the addition of soft-peak egg whites, it would be pretty difficult to convert this to a vegan recipe. I’ve read that you can whip aguafaba (chickpea soaking liquid) similarly to how you can whip egg whites, but I don’t know if that would work here. Please let me know if you try it!

Pieces of blueberry coffee cake on a white plate

Blueberry Coffee Cake

Blueberry Coffee Cake is a delicious breakfast option that your whole family will love. It's perfect for entertaining and even makes a tasty snack or dessert.
Print Recipe Pin Recipe
Prep Time 15 minutes mins
Cook Time 40 minutes mins
Total Time 55 minutes mins
Course Breakfast
Cuisine American
Servings 12

Ingredients
  

  • 2 cups Flour
  • 1 1/2 cup Sugar
  • 1/2 cup Butter or margarine (cut into small pieces)
  • 1 tablespoon Baking powder
  • 2 Eggs (separated)
  • 1 cup Milk
  • 1 tablespoon Vanilla
  • 2 – 2 1/2 cup Blueberries

Instructions
 

  • In a large mixing bowl, combine flour and sugar. Cut in butter or margarine, or mix with an electric mixer on low speed, until crumbly. Reserve 3/4 c. crumb mixture for topping.
  • To the remaining mixture, add baking powder, egg yolks (reserve whites in a separate bowl), milk and vanilla. Beat until combined, about 1 minute.
  • Whisk the reserved egg whites until soft peaks form. Gently fold into the batter.
  • Pour the batter into a greased 13×9 casserole dish. Cover with bluberries. Sprinkle reserved crumb mixture over the blueberries. Bake at 350 degrees for 35 – 40 minutes, until lightly browned and fully cooked.

Notes

  • Try replacing the vanilla extract with either an equal amount of almond extract or 2 tablespoons of freshly-squeezed lemon juice for a fun twist.
Keyword Blueberry Coffee Cake

Filed Under: Uncategorized

Peach Oatmeal Muffins

February 27, 2021 by KateMiller Leave a Comment

Whip up a batch of these Peach Oatmeal Muffins for a hearty and delicious breakfast or snack option. They’re packed with fresh peaches, oats and a tasty mixtures of spices. The whole family will love them!

Jump to Recipe

Homemade muffins are a perfect option for an on-the-go breakfast or afternoon snack.

These peach oatmeal muffins pack a healthy punch thanks to the addition or fresh peaches, oats, and applesauce as a replacement for nearly all of the oil. They also get an extra flavor boost from a spice mixture of cinnamon, nutmeg and ginger (similar to the spices in my popular Apple Spice Bars).

The final product is a moist and delicious muffin that’s just bursting with flavor! Kids and adults alike will eat them up.

How do you make peach oatmeal muffins from scratch?

I feel like homemade muffins tend to get a bad rap since they seem like they’d be a lot of work. Honestly, I’ve found the opposite to true.

It takes less than 10 minutes to stir up the batter and the muffins bake in 20 minutes. That means you can be snacking on these tasty treats in under 30 minutes. Sounds pretty easy to me. What do you think?

Making peach muffins from scratch starts with a simple batter and makes use of applesauce as a substitute for some of the oil. This makes the muffins healthier while still giving them that classic, moist muffin texture.

Make the batter

The first step in this recipe is to combine the following in a large mixing bowl:

  • 1/3 c. Brown sugar
  • 1/3 c. Granulated sugar
  • 1/3 c. Applesauce
  • 2 T. oil
  • 2 Eggs
  • 3/4 c. Milk
  • 2 T. Vanilla

I like to use my stand-mixer to make this process super easy – dump in the ingredients, turn on medium speed, and let it go for one minute.

If you don’t have a stand mixer, it’s just as easy with a hand-held mixer (blend on medium speed for one minute) or even by hand (stir briskly for 2 – 3 minutes, until everything is well combined).

Next, you’re going to combine your dry ingredients in a separate bowl. Stir together flour, baking powder, baking soda, cinnamon, nutmeg, ginger, salt and oats.

Then you’ll combine your dry ingredients with your wet ingredients and stir together for one minute. You can use a stand mixer or hand mixer for this step, but be careful to not over-mix. Over mixing will cause your muffins to be tough, so you definitely want to avoid that!

The last step is to fold in one diced peach just until combined. I do not peel the peach as I like the texture and extra pop of color that the peel provides, but you can peel yours, if you’d prefer.

Once your batter is all stirred together, pour it into a greased muffin tin. This recipe will get you about 12 regular-sized muffins or 24 mini muffins.

Bake the muffins in a preheated 400 degree oven for 15 to 20 minutes, until they are golden brown and pass the “toothpick test.” (i.e: a toothpick inserted in the middle of a muffin comes out clean)

How can I customize this recipe?

There are quite a few ways that you can customize this peach muffin recipe. One of the easiest ways to do that is with some additional mix-ins.

I’ve successfully stirred in the following additional ingredients with great success:

  • Chopped walnuts, pecans or almonds
  • White chocolate chips
  • Shredded coconut
  • Yellow raisins

You can also alter the spice measurements, or omit the nutmeg and/or ginger all together if you’re not a fan.

Another great customization option is to top the muffins with a simple streusel topping.

To do that, just combine 2 tablespoons flour, 5 tablespoons sugar ,and 1/2 teaspoon cinnamon in a small bowl. Then cut in 2 tablespoons of butter with a fork or pastry blender until coarsely crumbled. Sprinkle the topping over the peach muffin batter after you’ve poured it into the muffin tin and bake as directed.

Similarly, I’ve also used topped them with this Maple-Brown Sugar Frosting and served as a dessert. It’s a delicious combination!

FAQs

Can I use canned peaches in place of the fresh peaches?

Yes, you can used diced canned peaches in place of fresh peaches. If you do that, make sure to drain them very well before adding to your batter.

Can I use whole wheat flour in this recipe?

Absolutely! I’ve successfully made peach muffins from scratch using all white flour, all whole wheat, and a combination of both.

Can I make vegan peach muffins?

These muffins taste great when prepared with vegan substitutes. To do that, you will need to replace the eggs and milk with a vegan alternative.

For the eggs, I recommend replacing with a “flax egg” (1 tablespoon flax seed meal mixed with 2 1/2 tablespoons of water per egg replacement). If you’re not familiar, here’s a good flax egg tutorial.

For the milk, you can substitute either unsweetened almond milk or oat milk on a 1-to-1 basis.

Can I make these gluten free?

Make peach muffins gluten free by replacing the flour with an all-purpose gluten free flour blend or almond flour. Also, make sure that you are using gluten-free oats.

four peach muffins on a plate with a fresh peach

Peach Oatmeal Muffins

Whip up a batch of these Peach Muffins for a hearty and delicious breakfast or snack option. They're packed with fresh peaches, oats and a tasty mixtures of spices. The whole family will love them!
Print Recipe Pin Recipe
Prep Time 10 minutes mins
Cook Time 20 minutes mins
Total Time 30 minutes mins
Course Breakfast, Snack
Cuisine American
Servings 12 muffins

Ingredients
  

  • 1/3 cup Brown sugar
  • 1/3 cup Sugar
  • 1/3 cup Applesauce
  • 2 tablespoons Oil
  • 2 Eggs
  • 3/4 cup Milk
  • 2 teaspoons Vanilla
  • 1 1/3 cup Flour
  • 1 teaspoon Baking powder
  • 1 teaspoon Baking soda
  • 1 teaspoon Cinnamon
  • 1/2 teaspoon Nutmeg
  • 1/4 teaspoon Ground ginger
  • 1/4 teaspoon Salt
  • 1 cup Oats (quick or old-fashioned)
  • 1 Large peach, diced (about 1 1/2 cup)

Instructions
 

  • Combine the first 7 ingredients ( brown sugar, sugar, applesauce, oil, eggs, milk and vanilla)in a large mixing bowl and beat/mix until well combined.
  • Stir the dry ingredients together in a separate bowl and whisk/stir with a fork for a few seconds.
  • Slowly add the dry ingredients to the wet ingredients and stir just until combined. Fold in peaches.
  • Pour batter into greased (or lined) muffin tins and bake at 400 degrees for 15-20 minutes.

Notes

  • You can replace the fresh peaches with canned peaches, if you’d like. If you do, make sure that you drain the peaches completely before adding to your batter.
  • If you make mini muffins, check for doneness starting at around 12 minutes.
  • These muffins will stay fresh on the counter (well-covered) for about 3 days. If you’d like them to last longer, you can freeze in a plastic freezer bag and then thaw on the counter for at least 1 hour or in the microwave on defrost for about 25 seconds.
Keyword Peach Muffins

Filed Under: Breakfast, Recipes

Loaded Baked Potato Soup

February 25, 2021 by KateMiller Leave a Comment

Loaded Baked Potato Soup is packed with potatoes, bacon, cheese and green onions. It’s creamy and absolutely delicious!

A serving of loaded baked potato soup garnished with cheese, bacon and green onion

A creamy base made of mashed potatoes and milk is filled with generous amounts of potato chunks, bacon, cheese and green onions.

Garnish with even more bacon, cheese and green onions, plus a dollop of sour cream.

This soup is better than any restaurant soup you’ve ever tasted. So good!

How to make Loaded Baked Potato Soup

Like all really great recipes, this one starts with a pound of bacon! You know you’re in for a treat when that’s the first ingredient on the list.

To start, dice a pound of bacon (I find this easiest do with kitchen scissors) and cook in a large stock pot or dutch oven over medium heat until crisp.

Remove bacon with a slotted slotted spoon, place in a paper-towel-lined bowl (to absorb the grease) and set aside.

Drain all but two tablespoons of the bacon grease from the pot and add a diced onion. Cook for about 5 minutes, until tender.

Boil & mash the potatoes

Next, you’ll add five peeled and cubed Russet potatoes to the pot along with 3 cups of chicken stock which you’ll bring to a slow boil.

After the potatoes have simmered for about 20 minutes, until fork-tender, use a slotted spoon to remove a few scoops of potatoes. Put them in and mash, then set aside. This is key part of this recipe as it really helps to make the soup extra thick and creamy.

Make a roux

The next step is to make a roux in a small saucepan. You’ll do this by melting some butter, stirring in some flour and cooking until the flavor turns a pale golden brown.

Then, you’ll slowly stir in one and a half cups of milk, stirring/whisking the whole time. Bring the milk just to a boil, reduce heat and simmer until thickened to a gravy consistency. Since milk has a tendency to scald quickly, be sure to keep a close eye on it and stir frequently.

Once the milk is thickened, you’ll slowly stir it into the soup pot to thicken the soup and stir back in the mashed potatoes that you set aside.

Finish it off

Next, stir in a 1/2 cup of shredded cheddar cheese, 3/4 of the cooked bacon and one and a half sliced green onions. Season with salt and pepper.

Stir everything together and let the soup finish cooking for 5 minutes.

Serve the Loaded Baked Potato Soup

Ladle the soup into individual bowls and garnish each bowl with some more shredded cheese, bacon, sliced green onions, and salt and pepper, to taste. You can also add a dollop of sour cream to the top of each bowl if you’d like.

Serve with some fresh, homemade bread, like my Maple Oat Bread or English Muffin Bread, for a delicious dinner that will warm you up, fill you up, and delight your tastebuds!

FAQs

Is there a vegetarian option for this recipe?

You can easily make this recipe vegetarian. To do that, just replace the chicken stock with vegetable stock and omit the bacon. You can add some french fried onions as part of the garnish for a similar crunch and salty kick.

Can I freeze Loaded Baked Potato Soup?

You can freeze this soup, but be aware that the texture will not be the same when you reheat it. It will still taste just as delicious though, so if you aren’t concerned with texture, go ahead and freeze it.

Otherwise, leftovers will stay good in the fridge for 2-3 days. If you are saving some for leftovers, I recommend setting aside the garnish as well and then topping the soup after it has been reheated.

A serving of loaded baked potato soup garnished with cheese, bacon and green onion

Loaded Baked Potato Soup

Loaded Baked Potato Soup is packed with potatoes, bacon, cheese and green onions. It's creamy and absolutely delicious!
Print Recipe Pin Recipe
Prep Time 15 minutes mins
Cook Time 30 minutes mins
Total Time 45 minutes mins
Course Soup
Cuisine American
Servings 6

Ingredients
  

  • 1 pound Bacon (diced)
  • 1 Onion (diced)
  • 5 large Russet potatoes (peeled and cubed)
  • 3 cups Chicken stock
  • 3 Tablespoons Butter
  • 3 Tablespoons Flour
  • 1 1/2 cups Milk
  • 3 Green onions (sliced)
  • 3/4 cup Shredded cheddar cheese (divided)
  • 1 teaspoon Salt
  • 1/2 teaspoon Black pepper
  • Sour cream for garnish (optional)

Instructions
 

  • In a large stock pot, cook bacon until crisp. Remove with a slotted spoon to drain and set aside. Drain all but 2 T. of bacon grease from the pot. Cook the onions in the remaining bacon grease for about 5 minutes, until tender.
  • Add potatoes and chicken stock to pot. Bring to a boil, reduce heat to medium and simmer about 20 minutes, until potatoes are tender. With a slotted spoon, remove a few scoops of potatoes. Place in a bowl and mash with a fork. Set aside.
  • In a small sauce pan, melt butter. Stir in flour and cook for 2 minutes. Whisk in milk, bring to a boil and simmer until thickened. Slowly stir in to stock pot. Bring to a boil, reduce heat to low and simmer. Stir mashed potatoes back into pot.
  • Add 1/2 c. shredded cheese, three-fourths of the bacon and half the sliced green onions to pot. Add salt and pepper. Stir to combine. Cook an additional 5 minutes.
  • To serve, ladle soup into individual bowls and top with some shredded cheese, bacon, green onions and optional sour cream.
Keyword Loaded Baked Potato Soup

Filed Under: Recipes, Soup

Chicken with Leeks and Apples

February 24, 2021 by KateMiller Leave a Comment

The fresh and savory flavors of Chicken with Leeks and Apples create an unforgettable meal. Easy enough for a weeknight dinner yet elegant enough for entertaining.

Jump to Recipe

You might not immediately think of putting together the ingredients in this recipe, but trust me when I say that you won’t regret it!

The flavors and textures in Chicken with Leeks and Apples create an absolutely amazing dish. It’s saucy, savory and so good.

Even if you don’t think you’re a fan of leeks, I encourage you to give this a shot. I promise you’ll be pleasantly surprised.

How to make Chicken with Leeks and Apples

I love chicken breast for weeknight meals because they make it easy to get dinner on the table in a hurry. This recipe is no exception.

To make this dish, you begin by heating some olive oil in a large skillet and then adding chicken breasts or tenders that have been seasoned with salt and pepper.

You are just searing the chicken at this stage, so you don’t have to worry about cooking it all the way through. Instead, you’ll brown both sides for 3-5 minutes per side.

Then, remove the chicken and keep warm. The easiest way to do that is to put the chicken on a plate or baking sheet and cover with foil.

While the chicken is browning, slice the leeks (both the green and the white parts) and place into a large bowl filled with cold water. Let the leeks sit for a minute or two and then agitate with your hands or a spoon. Drain leeks into a colander and rinse thoroughly with cold water.

This step is crucial to get all of the dirt out from between all of the layers of the leeks.

After you’ve washed the leeks and finished browning the chicken, you’ll add the leeks, and some garlic, rosemary and sugar to the skillet.

Cook the leeks over medium heat until they’re tender, about 5 minutes. Then, stir in a 1/4 cup apple cider vinegar and continue cooking until most of the liquid is absorbed.

Next you’ll return the chicken to the skillet along with two sliced apples and a cup of chicken stock.

Bring the stock to a slow boil a continue cooking until the liquid is reduced by half and the chicken is fully cooked. Test the chicken with a meat thermometer to make sure that it’s reached 165 degrees.

How to serve this dish

Chicken with Leeks and Apples is delicious served over all kinds of different starch options.

We love the combination with a nutty, chewy barley, but here are some other options that work equally well:

  • white or brown rice
  • mashed potatoes
  • farro
  • orzo
  • pasta

A separate side dish isn’t really needed with this meal, but a simple spinach salad and some crusty bread will really put it over the top!

FAQs

Can I use something other than chicken breasts is this recipe?

Yes; you can replace the chicken breasts with boneless, skinless chicken thighs. Or try it with turkey breast cutlets or pork cutlets. Note that you will need to adjust the cooking time accordingly.

Can I make Chicken with Leeks in an instant pot?

You can make this recipe in an instant pot if you’d like. To do that, brown the chicken and cook the leeks directly in the instant pot on saute mode.

Continue in saute mode when you add the apple cider vinegar. Then, return the chicken to the instant pot and add the apple slices and chicken stock.

Cover the lid. Switch to manual mode. Cook on high (full pressure) for 5 mins. Let the pressure release naturally for 10 minutes. Then do a quick release for any remaining pressure.

What if I can’t find leeks? Can I substitute anything?

The combination of leeks and apples is definitely what makes this a stand-out recipe. However, if you’re desperate and can’t find leeks, you can replace with one large, sliced yellow onion. The final dish will be delicious!

Can I make this recipe in advance?

You can make Chicken with Leeks and Apples up to 2 days in advance and then reheat when serving. You can also freeze this meal by preparing completely and then freezing in a plastic freezer bag once cooled. It’s an easy recipe to double or triple, so that makes it a great meal prepping option.

a serving of chicken with leeks and apples over barley on a black plate

Chicken with Leeks and Apples

The fresh and savory flavors of Chicken with Leeks and Apples create an unforgettable meal. Easy enough for a weeknight dinner yet elegant enough for entertaining.
Print Recipe Pin Recipe
Prep Time 10 minutes mins
Cook Time 20 minutes mins
Total Time 30 minutes mins
Course Dinner
Cuisine American
Servings 4

Ingredients
  

  • 1 tablespoon Olive oil
  • 1 pound Boneless, skinless chicken breasts or tenders
  • Salt and pepper (to taste)
  • 1 Leek, thinly sliced (white and green parts)
  • 4 Cloves garlic (minced)
  • 1 tablespoon Dry rosemary
  • 1 tablespoon Sugar
  • 1/4 cup Apple cider vinegar
  • 2 Apples (peeled and sliced)
  • 1 cup Chicken stock

Instructions
 

  • Heat olive oil in a large skillet. Season chicken with salt and pepper and add to skillet. Cook until both sides are browned, about 3-5 minutes per side. Remove chicken and keep warm.
  • While chicken browns, place the sliced leeks in a bowl of cold water and let sit for a couple of minutes. Agitate the water with your hands or a spoon and then drain in a colander. Rinse well with cold water and shake the colander well to drain off as much of the water as possible.
  • Add leeks, garlic, rosemary and sugar to skillet. Cook until leeks are tender, about 5 minutes. Add cider vinegar and simmer until most of the liquid is absorbed.
  • Return chicken to skillet. Add apples and chicken stock. Bring to a slow boil and cook an additional 10-12 minutes, until liquid is reduced by half and chicken is fully cooked.

Notes

  • Try this recipe with turkey breast cutlets to mix things up.
  • Serve over barley, rice, orzo, mashed potatoes or pasta.
  • Make sure that you clean the leeks well before adding them to the skillet.
Keyword Chicken with Leeks and Apples

Other recipes you might like:

  • Chicken Cordon Bleu Casserole
  • Chicken and Apples in Honey Mustard Sauce
  • Chicken with Brown Butter and Capers
  • Deconstructed Broccoli & Cheese Stuffed Chicken

Filed Under: Dinner, Recipes

Meatloaf Pie

February 23, 2021 by KateMiller Leave a Comment

Meatloaf Pie is comfort food at its finest! A meatloaf “crust” is filled with creamy mashed potatoes and topped with a layer of caramelized onions and melty cheese.

Jump to Recipe

This Meatloaf Pie recipe combines all of the best classic comfort foods into one unbelievably delicious dish.

It starts with a meatloaf “crust” that’s then filled with creamy mashed potatoes. Next, the potatoes are topped with a savory layer of caramelized onions. Finally, a layer of melty cheese tops off the entire dish for a can’t-resist finish!

How to make Meatloaf Pie

Although this recipe might seem like it requires some extra work, it really doesn’t. If you usually make meatloaf and mashed potatoes together, this is essentially the same process and time commitment.

Meatloaf pie starts with a basic meatloaf recipe that becomes the pie “crust.” It’s a combination of the following ingredients:

  • Ground beef
  • Breadcrumbs
  • Grated Parmesan cheese
  • Salt
  • Italian seasoning
  • Garlic powder
  • Black pepper
  • Egg

All of the ingredients are mixed together, as in a typical meatloaf. Then, the meatloaf mixture is pressed into a crust shape.

You can use a deep-dish pie plate for this recipe. However, if you have a springform pan on hand, that’s what I recommend. (This is the one I use and love.)

I recommend this method because it allows you to easily remove the pie in whole and place on a serving dish for a beautiful presentation.

After you’ve pressed the meatloaf mixture into the pie plate or springform pan, bake in the oven at 350 degrees for 15 – 20 minutes.

Start working on the mashed potatoes by boiling cubed potatoes while the meatloaf bakes.

Assembling the Meatloaf Pie

Once you’ve removed the meatloaf crust from the oven, you’ll need to remove the extra grease before proceeding with the next step.

To do that, use either a spoon or turkey baster to scoop out the excess grease and then pat up any of the remaining grease with some extra paper towels.

When the potatoes are done cooking, drain and return to the pot. Mash well and then combine with butter, milk, sour cream and salt pepper. Stir until desired consistency. Scoop into the pre-baked meatloaf crust.

Next, caramelize the onions by cooking thinly sliced yellow onions in butter for about 15 minutes. Spoon on top of the mashed potatoes.

Cover the onions with a generous cup of shredded cheese and return the whole dish to the oven for about 15 minutes, until the cheese is melted.

Can I make this dish ahead of time?

You can absolutely make meatloaf pie ahead of time!

And what’s even better is that there are several different levels of “making-ahead” that you can use.

Each of the individual components of the pie can be made in advance.

You can mix up the meatloaf mixture and then refrigerate.

You can also make the mashed potatoes and caramelized onions ahead of time and refrigerate until you’re ready to assemble.

Then, when it’s dinner time, you can prep and bake the meatloaf crust, assemble the pie and continue as directed.

Another option is to bake the meatloaf crust and prepare the potatoes and onions. Then assemble the full pie and refrigerate. Bake for 15 minutes to warm through and melt the cheese before serving.

If you want to make this more than just a day or two ahead of time, you can freeze the fully assembled pie.

If you’ve made your pie in a pie plate, I recommend you freeze in that plate. In this instance, I’ve found it easiest to use a disposable, foil pie pan. To warm, cook from frozen for around 30-45 minutes, until heated through. (Important Note: if you froze your meatloaf pie in a glass pie plate, make sure that you let it come to room temperature before baking. Otherwise the glass has the potential to shatter in the oven.)

On the other hand, if you used a springform pan, remove the completed pie and wrap in freezer paper. Place in a large plastic freezer bag or wrap tightly with freezer-friendly plastic wrap. To warm, unwrap and place on a cookie sheet. Bake from frozen for 30-45 minutes, until heated through.

Whole meatloaf pie on a serving plate

How can I customize this recipe?

There are lots of ways you can play around with this recipe and all of them are delicious! In fact, I’ve yet to try something that didn’t turn out awesome.

This recipe is the basic version of meatloaf pie and it is 100% delicious and absolutely stands on its own. You will never go wrong making and serving this as is.

That said, here are some of my favorite customization options:

  • Add a layer of barbecue sauce or gravy on top of the onions.
  • Stir some frozen, chopped spinach into the mashed potatoes.
  • Add a layer of corn under the onions.
  • Replace half of the potatoes with cauliflower to make a cauliflower mash.
  • Cook some sliced mushrooms with the onions.
  • Stir some cooked and crumbled bacon and sliced green onions into the mashed potatoes.
slice of meatloaf pie on a plate

Meatloaf Pie

Meatloaf Pie is comfort food at its finest! A meatloaf "crust" is filled with creamy mashed potatoes and topped with a layer of caramelized onions and melty cheese.
Print Recipe Pin Recipe
Prep Time 30 minutes mins
Cook Time 35 minutes mins
Total Time 1 hour hr 5 minutes mins
Course Dinner
Cuisine American
Servings 8

Ingredients
  

For the beef crust

  • 1 pound Ground beef
  • 1 1/2 cup Breadcrumbs
  • 1/3 cup Grated Parmesan cheese
  • 2 tablespoons Salt
  • 1 tablespoon Italian seasoning
  • 1 tablespoon Garlic powder
  • 1/2 tablespoon Black pepper
  • 1 Egg

For the mashed potatoes

  • 4 – 6 Potatoes
  • 1/4 cup Butter or margarine
  • 1/4 cup Milk
  • 1/4 cup Sour cream
  • Salt and pepper (to taste)

For the caramelized onions

  • 2 tablespoons Butter or margarine
  • 1 Large yellow onion (thinly sliced)
  • 1/2 tablespoon Salt

Topping

  • 1 cup Shredded cheddar cheese

Instructions
 

For the beef crust

  • Combine all ingredients in a bowl and mix well. Press into the bottom and up the sides of a deep-dish pie plate or springform pan.
  • Place pan on a cookie sheet and bake at 350 degrees for 15-20 minutes. Remove from oven, remove excess grease from the top of the meat with a spoon or paper towel. Cool.

For the mashed potatoes

  • Cube potatoes, place in a medium sauce pan and fill pot with coldwater. Bring to a boil and simmer for 15-18 minutes, until potatoes are tender.
  • Drain potatoes and return to pot. Add butter or margarine and mash with potatoes. Stir in remaining ingredients. Scoop into the center of the beef "crust."

For the caramelized onions

  • Melt butter or margarine in a small skillet. Add onion and season with salt. Cook about 15 minutes over medium-low heat, until golden. Scoop on top of the mashed potatoes.

Topping

  • Sprinkle cheese over the onions and return to oven. Bake an additional 10-12 minutes, until cheese is completely melted.

Notes

  • Bake the meatloaf pie in a springform pan if you’re prioritizing presentation.
  • If you’re making this ahead of time and planning to freeze the completed meatloaf pie, make it in a disposable foil pan.
  • Make sure you remove all of the excess grease after baking the meatloaf crust.
Keyword Meatloaf Pie

Other recipes you might enjoy:

  • Ground Beef Stew
  • Glazed Meatloaf
  • Homemade Hamburger Helper Cheeseburger Macaroni

Filed Under: Dinner, Recipes

Peanut Butter Jelly Thumbprint Cookies

February 21, 2021 by KateMiller Leave a Comment

Peanut Butter Jelly Thumbprint Cookies turn the classic sandwich into a tasty cookie treat that makes a perfect sweet snack any time of day!

Jump to Recipe

The classic flavors of peanut butter and jelly – what’s not to love?

These cookies marry those classic flavors and put a sweet spin on them. They start with a crispy yet chewy peanut butter cookie base and are topped with a healthy dollop of your favorite jam or jelly.

It’s pb & j perfection, in cookie form!

How to make Peanut Butter Jelly Thumbprint Cookies

This recipe mixes up in a snap, especially if you have a stand mixer.

But even if you don’t, you can go from ingredients to eating in less than 30 minutes.

Like all good cookie recipes, this one starts with a base of butters and sugars.

Mix together butter and peanut butter until combined. Add in 3/4 cup each of brown sugar and granulated sugar and then beat until light and fluffy.

Add an egg, one tablespoon of vanilla extract and two tablespoons of milk, and continue to mix together.

Up through this stage, you can not over-beat your ingredients. After I add the egg, vanilla and milk, I like to let the stand mixer run for about 90 seconds on medium speed just to get all of the ingredients fully incorporated and creamy/fluffy.

When you move on to the next step of adding the dry ingredients, you need to be much more mindful of over-mixing. This can cause your cookies to become tough and you definitely don’t want that!

While your wet ingredients mix together, combine the dry ingredients (flour, baking soda, salt and oats) in a small bowl. Stir or whisk together for about 15 seconds.

Next, begin to add the dry ingredients into the wet ingredients in small batches. Mix after each addition, just until combined.

If you have time (and patience!), let the dough chill in the refrigerator for at least one hour before rolling into balls and baking. This step is not needed, but it will result in cookies that are a little thicker since they will not spread as much when they bake.

When ready to bake, roll about a tablespoon of dough into a ball and place on a cookie sheet. (If you have one, use a cookie scoop for even-sized balls)

As you place the dough balls on the cookie sheet, make sure you leave enough space between as the cookies will spread a bit.

Once you’ve filled the cookie sheet, use your thumb to make a small indentation in each ball of dough. Then, spoon your jam or jelly of choice into each spot.

Bake the cookies at 350 degrees for 15 to 18 minutes, until golden brown and crisp around the edges. Cool on a wire rack.

Close up of peanut butter jelly thumbprint cookies

Can I make this recipe in advance?

This dough freezes beautifully! I love to have a bag of these dough balls in the freezer at all times.

You have a few options for freezing the dough:

  1. Form the prepared dough into a flat disc, wrap with freezer paper and place in a freezer bag.

    To use, let the dough thaw completely (at least 6 hours) in the refrigerator. Then, roll the dough into balls and proceed as usual.
  2. Roll the dough into balls and place on a cookie sheet. Then, flash freeze by placing the cookie sheet in the freezer for 30 minutes. (Flash freezing will keep the dough from sticking together.) Place the frozen dough balls in a plastic freezer bag and return to the freezer.

    To use, pull out as many peanut butter cookie dough balls as you want to make and place on a cookie sheet. Let stand at room temperature for about 15 minutes, until soft enough for you to make the thumbprint indentation. Then, fill with jelly and bake as listed.

    This freezing method is perfect for baking just a few cookies at a time!

I do not recommend freezing the baked cookies as the jelly thumbprint loses some quality when frozen and thawed.

How can I customize this recipe?

There are a few fun twists that you can use to make this Peanut Butter Jelly Thumbprint Cookies recipe your own.

Here are some of my favorite tried-and-tested options:

  • Add an additional 1/4 cup of flour for thicker cookies that do not spread as much.
  • Replace the jelly or jam with honey before baking.
  • Replace the jelly or jam with Nutella or other chocolate-flavored spread after baking.
  • Roll the dough balls in sugar before placing on a cookie sheet for a crispy, sugary bite.
  • Replace the oats with granola or rice krispies for a crunchy bite.

If you try any other ideas, I’d love to hear about them and how they turn out for you!

3 peanut butter jelly thumbprint cookies on a plate with a small glass of milk.

Peanut Butter Jelly Thumbprint Cookies

Peanut Butter Jelly Thumbprint Cookies turn the classic sandwich into a tasty cookie treat that makes a perfect sweet snack any time of day!
Print Recipe Pin Recipe
Prep Time 10 minutes mins
Cook Time 18 minutes mins
Chill Time (OPTIONAL) 1 hour hr
Total Time 1 hour hr 28 minutes mins
Course Dessert, Snack
Cuisine American
Servings 36 cookies

Ingredients
  

  • 3/4 cup Butter or margarine
  • 3/4 cup Peanut butter (creamy or chunky)
  • 3/4 cup Brown sugar
  • 3/4 cup Sugar
  • 1 Egg
  • 1 tablespoon Vanilla
  • 2 tablespoons Milk
  • 1 1/4 cup Flour
  • 1 tablespoon Baking soda
  • 1/4 tablespoon Salt
  • 1/2 cup Oats
  • 1/2 cup Jelly or jam of your choice

Instructions
 

  • Cream together the butter or margarine, peanut butter and sugars until light and fluffy. Mix in the egg, vanilla and milk.
  • Stir in the flour, baking soda, salt and oats just until combined.
  • Refrigerate dough for an hour to make handling easier, if you have the time. (This is optional.)
  • Roll about a tablespoon of dough into ball and place on a cookie sheet. When the cookie sheets are full, make an indentation with your thumb in each ball and fill with jam.
  • Bake at 350 degrees for 15 to 18 minutes, until golden brown.
  • Cool on a wire rack. Enjoy!

Notes

  • I recommend using jam instead of jelly since it is thicker and will not spread as much when baked.
  • Increase the amount of flour by 1/4 cup if you want thicker cookies that do not spread as much.
Keyword Peanut Butter Jelly Thumbprint Cookies

Other recipes you might like:

  • Copycat Starbucks Molasses Cookies
  • 5 Minute Homemade Peanut Butter
  • Peanut Butter & Jelly Breakfast Cookies

Filed Under: Cookies, Recipes, Uncategorized

Oatmeal Butterscotch Bars

February 16, 2021 by KateMiller Leave a Comment

Enjoy these delicious Oatmeal Butterscotch Bars as a dessert or sweet snack. Perfect with a cup of coffee or a glass of milk. Kids and adults love them!

Jump to Recipe

If you are a fan of the delicious caramel-y, brown sugar flavor of butterscotch, you are going to love these bars!

Packed with quick oats, butterscotch chips and a delicious cookie base, Oatmeal Butterscotch Bars will quickly become a favorite with everyone who tries them.

They bake up crispy on the outside and soft and chewy on the inside. Their taste and texture is somewhat reminiscent of a granola bar. So good!

How to make Oatmeal Butterscotch Bars

These bars begin like so many traditional cookie recipes – butter, brown sugar, white sugar, vanilla and eggs.

Those ingredients all get beaten together until light and fluffy. You can do this using either a hand mixer or stand mixer. You could do it by hand in a pinch, but be prepared for your arm to get very tired!

Next, combine the flour, baking soda, salt and cinnamon and then pour into the butter mixture in 2 or 3 batches, stirring to combine after each addition.

Finally, pour in the oats and butterscotch and fold in by hand.

Once your batter is all mixed together, spread and press it into a 15 x 10 jelly roll / sheet cake pan. Bake at 375 degrees for about 20 minutes, until golden brown and set in the middle.

What if I don’t have a 15 x 10 jelly roll pan?

No worries! There are a few options for you if you don’t have a classic jelly roll pan available.

You can bake the bars in a 13 x 9 casserole dish. You’ll need to add about 5 minutes to the baking time though, so make sure you keep an eye on them.

You can also press the dough into 2 smaller baking pans, or press into a larger one and eyeball a 15 x 10 rectangle. I’ve done that a few times myself and the consistency of the dough makes it pretty easy to do.

Can I make these bars ahead of time?

You can make Oatmeal Butterscotch Bars in advance, but you’ll need to be mindful with how you store them. If they’re not stored properly, they tend to harden and dry out.

I’ve found that storing them in a plastic bag or in a plastic storage container with a tight-fitting lid works best. When stored this way, they usually stay fresh for 3-5 days before the texture starts to diminsh.

You can also freeze the baked bars. To do that, let them cool completely before cutting into individual bars. Then, place the in a single, flat layer in a plastic freezer. I usually need two bags to store the full recipe.

To use from frozen, set the number of bars desired on a plate and let come to room temperature before enjoying.

If you’re in a hurry, you can warm the bars in the microwave for about 5 seconds per bar.

How to customize this recipe

There are plenty of additions, deletions and substitutions you can make to make these Oatmeal Butterscotch Bars your own.

I like to mix them up a little bit each time I make them, so I encourage you to have fun with the recipe as well.

Here are some ideas to try:

  • Cut the butterscotch chips in half or remove completely and replace with an equal measure of: chocolate chips, white chocolate chip, peanut butter chips, M&Ms, raisins, dried cranberries or dried cherries
  • Reduce the oats by 1 cup to create more of a cookie-bar texture
  • Swap 1/2 cup of butter for 1/2 cup of peanut butter

Another idea to try is to warm a bar for a few seconds, top with a heaping scoop of vanilla ice cream and a drizzle of butterscotch syrup. So good!

two oatmeal butterscotch bars on a plate

Oatmeal Butterscotch Bars

Enjoy these delicious Oatmeal Butterscotch Bars as a dessert or sweet snack. Perfect with a cup of coffee or a glass of milk. Kids and adults love them!
Print Recipe Pin Recipe
Prep Time 10 minutes mins
Cook Time 20 minutes mins
Total Time 30 minutes mins
Course Dessert, Snack
Cuisine American
Servings 15

Ingredients
  

  • 1 cup Butter or margarine
  • 3/4 cup Sugar
  • 3/4 cup Brown sugar
  • 2 Eggs
  • 1 tablespoon Vanilla
  • 1 1/4 cup Flour
  • 1 tablespoon Baking Soda
  • 1/2 tablespoon Salt
  • 1/2 tablespoon Cinnamon 
  • 3 cups Oats
  • 1 cup Butterscotch chips

Instructions
 

  • Beat the butter or margarine with the sugar until fluffy. Add the eggs and vanilla and continue beating until well combined.
  • In a small bowl, stir together the flour, baking soda, salt and cinnamon. Add to the mixing bowl and beat just until combined.
  • By hand, stir in the oats and butterscotch chips. Press into a greased 15×10 baking (jelly-roll) pan and bake at 375 degrees for 18-22 minutes, until lightly browned.

Notes

  • Customize by swapping some or all of the butterscotch chips for chocolate chips, peanut chips, raisins, dried cranberries, or whatever you can come up with!
  • Reduce the amount of oats you add to just 2 cups for a more cookie bar-like texture.
  • If you bake in a 13 x 9 casserole dish (instead of a 15 x 10 baking sheet), be prepared to add about 5 minutes to the cooking time and watch carefully.
Keyword Oatmeal Butterscotch Bars

Other recipes you might enjoy:

  • Oatmeal Breakfast Bars
  • Peanut Butter & Jelly Cookies
  • Chocolate Raisin Bars
  • Oatmeal Cream Pie Cookie Cake

Filed Under: Cookies, Dessert, Recipes

Taco Stuffed Potato Skins

February 13, 2021 by KateMiller Leave a Comment

Love potatoes and tacos? Then you will love this recipe for Taco Stuffed Potato Skins! Double the recipe so that you’ll have plenty to freeze for later.

Jump to Recipe

Potato skins are one of the most popular appetizers and tacos are one of the most popular dinners around. So, combining the two creates something amazing!

If your family loves both of these things just like mine does, I highly recommend that you make Taco Stuffed Potato Skins ASAP. Trust me when I say that you won’t regret it.

How do I make Taco Stuffed Potato Skins?

Potato skins by their very nature are a little bit more time-intensive than other appetizer options, but they’re definitely worth a little extra effort.

The first step to making Taco Stuffed Potato Skins is baking the potatoes until they’re soft. This takes about 45 – 60 minutes, depending on the size of your potatoes.

Next, the potatoes will need to cool enough so that you can handle them easily. I usually will toss them in the fridge for an hour or so.

Since the baking and cooling of the potatoes is what takes the longest, it’s often easier to do this the day before or in the morning.

After the potatoes have cooled, the next step is to cut them in half and scoop out the insides. It is very important that you leave enough potatoes in the skins to leave a solid base. Otherwise they will fall apart when you eat them.

Once ready, you’ll brush the skins with some oil, sprinkle generously with salt and bake for 15-20 minutes, until they start to crisp.

While the skins bake, prepare the taco filling.

Scoop the filling into the warm skins, cover with sprinkled cheese and then return to the oven for 5 minutes to melt the cheese.

Can I make this recipe ahead of time?

You absolutely can Taco Stuffed Potato Skins ahead of time, and I highly recommend that you do.

There are actually multiple ways that you can make this recipe ahead of time. That ends up making this a convenient recipe, even with the fact that it does require more work.

Option #1 – Make the potatoes ahead of time. You can bake them up to 3 days ahead of time before you cut and prep the skins.

Option #2 – Make and prep the potatoes and filling ahead of time. When you’re ready to make them, bake the skins, fill with the taco filling, cover with cheese and then bake another 15 minutes, until the filling is warm and the cheese is melted.

Option #3 – Make the potato skins up through the point bake the skins. Make the taco filling but let it cool before stuffing the potatoes. Set the baked skins on a cookie sheet, scoop the cooled taco filling into the skins and cover with shredded cheese. Place in the freezer to flash freeze for about an hour, then transfer frozen potato skins to plastic freezer bags.

To reheat frozen potato skins, bake at 425 degrees for about 15 minutes, until fully heated.

If you’re going to freeze your taco stuffed potato skins, definitely consider doubling or tripling the recipe so that you can have plenty on hand for snacks, lunches, appetizers and dinners.

Customization and topping ideas

There are all kinds of things that you can switch up in this recipe to make it your own!

Here are some tried-and-tested customization and topping ideas that your family is sure to love.

  • Add a cup or two of kidney beans or black beans to the filling
  • Add some corn to the filling
  • If you like a little kick, stir some diced green chilies into the filling
  • Dice some onion and green pepper and cook with the ground beef
  • Swap the ground beef for ground turkey
  • Top with any of the following options: sour cream, salsa, guacamole, queso sauce, shredded lettuce, diced tomatoes, and/or fresh cilantro

Once you get the general idea mastered, you can have so much fun with these potato skins! Experiment with different ideas based on your family’s preferences.

Two taco stuffed potato skins on a plate

Taco Stuffed Potato Skins

Love potatoes and tacos? Then you will love this recipe for Taco Stuffed Potato Skins! Double the recipe so that you'll have plenty to freeze for later.
Print Recipe Pin Recipe
Prep Time 30 minutes mins
Cook Time 1 hour hr 30 minutes mins
Cooling time 2 hours hrs
Total Time 4 hours hrs
Course Appetizer, Dinner, Lunch
Cuisine American, Mexican

Ingredients
  

  • 4 Large Russet potatoes or 8 medium-large Yukon gold potatoes
  • 2 tablespoons Oil
  • Salt
  • 1/2 – 1 pound Ground beef
  • 1 tablespoon Chili powder
  • 1/2 tablespoon Cumin
  • 1/2 tablespoon Salt
  • 1/2 cup Salsa or picante sauce
  • 1 cup Shredded cheese

Instructions
 

  • Scrub potatoes and pierce a few times with a fork. Bake in a 375 degree oven for 45-60 minutes, until soft to the touch. Chill in the refrigerator until cool enough to handle, typically at least 2 hours.
  • Cut the potatoes in half lengthwise. Scoop out the middle of each potato half and set aside for another use. (Make sure you leave a nice base of potato in each skin or else they will fall apart while eating.)
  • Lightly brush all sides of the potato skins, sprinkle liberally with salt and place on a cookie sheet. Bake at 375 degrees for 15-20 minutes, until golden brown and crisp around the edges.
  • While the potato skins crisp, brown ground beef. Drain. Stir in chili powder, cumin, salt and salsa or picante sauce. Cook for 5 minutes, until thickened.
  • Scoop some of the ground beef filling into each potato skin and top each with some cheese. Return to the oven for 5 minutes, until cheese is melted.

Notes

  • Prep the potatoes, and even the filling, up to 3 days in advance and you’ll be able to get dinner on the table quickly.
  • Make sure you allow enough time for the potatoes too cool so that you do not burn yourself.
  • Add beans, corn, onions, and/or green pepper to the filling for a heartier potato skin.
  • Top with all of your favorite taco toppings when serving.
Keyword Taco Stuffed Potato Skins

More recipes to try:

  • Taco Macaroni Skillet
  • Caribbean Pork Stew
  • Pizza Pie Bites
  • Taco Bowls

Filed Under: Uncategorized

Artichoke Salsa

February 11, 2021 by KateMiller Leave a Comment

Jump to Recipe

Try something different with this Artichoke Salsa recipe. It’s a fun and tasty twist on the classic that makes a great appetizer or snack.

Prepared artichoke salsa on a pita chip

If you’re looking to mix up your dip or appetizer game, you’re in luck!

This recipe for artichoke salsa will be a hit whether you’re entertaining or just grabbing a few chipfuls out of the fridge throughout the week.

The combination of tangy, marinated artichoke hearts, olives, tomatoes, garlic and basil will definitely wow your taste buds. It definitely qualifies as a unique recipe, but I guarantee you won’t regret making it!

How to make Artichoke Salsa

You can throw this salsa together in just a few minutes.

First, gather all of your ingredients:

  • Marinated artichoke hearts
  • Black olives
  • Grape tomatoes
  • Garlic
  • Fresh basil
  • Crushed red pepper flakes
  • Salt and pepper

Reserve two tablespoons of the artichoke heart marinade and then drain the rest.

Next, coarsely chop the artichoke hearts, olive and tomatoes. You don’t want them too big or too small, although it’s better to err on the side of too small if you aren’t sure. If you leave the pieces too big, it will be difficult to eat.

For this salsa, I like the rustic look of a rough chop instead of cutting everything uniformly. So, I just place the ingredients on a cutting board and then chop through them all together with a chef’s knife.

Artichoke salsa ingredients on a cutting board.

After you’ve chopped the artichoke hearts, olives and tomatoes, you’ll finely mince 2 cloves of garlic and some fresh basil.

Add all of the ingredients into a bowl, season with the crushed red pepper flakes, salt and pepper, and then toss with the reserved artichoke heart marinade.

You can eat this right away, but I recommend you let it chill in the fridge for at least 30 minutes before eating so that the flavors have a chance to blend together.

Substitutions, Tips & FAQs

If you want to customize this Artichoke Salsa, there are all kind of changes you can make to make it your own.

Some additions that I recommend are:

  1. A couple tablespoons of capers
  2. A finely diced small red onion
  3. 1/4 cup sliced green onions
  4. 1/4 cup diced roasted red peppers
  5. 1 small Jalapeno, minced (if you like a kick!)
  6. 1/4 cup shredded Parmesan cheese or crumbled goat cheese
  7. 1/2 cup diced, roasted Eggplant
  8. 1/2 cup diced cucumber

Can I make this recipe ahead of time?

Absolutely! And I highly recommend that you do. It just gets better the more the flavors mature. It will stay good in the fridge for up to 5 days. I do not recommend freezing.

Do I have to use fresh basil?

I know it can be difficult to fresh basil, especially depending on the time of year. You can definitely swap the fresh for a teaspoon of dried.

However, if you do swap, you’ll lose the pretty green that looks so nice throughout the salsa. If that matters to you, you can add a tablespoon of fresh, minced parsley along with the dried basil.

Can I use regular canned artichoke hearts?

I personally think the the marinated artichoke hearts are the star of the show here. But, if you’re not a fan or if you can’t find them in your grocery store, you can use regular, canned artichoke hearts in a pinch.

If you use those, mix together a quick vinegar-lemon fusion to stir in to the salsa.

Just combine 2 teaspoons white wine vinegar, 2 teaspoons lemon juice, a pinch of salt, and 1 tablespoon water. Whisk together until blended and then stir into the Artichoke Salsa in place of the reserved artichoke marinade.

What should I serve with artichoke salsa?

There are lots of great options that work as “vehicles” for this salsa! Some tried-and-tested options are:

  • Fresh pitas, quartered
  • Pita chips
  • Tortilla chips
  • Pretzel thins
  • Toasted Italian bread slices
  • Water crackers

You can even stir a few spoonfuls into some cooked pasta for a quick and delicious pasta salad.

prepared artichoke salsa on a pita chip

Artichoke Salsa

Try something different with this Artichoke Salsa recipe. It's a fun and tasty twist on the classic that makes a great appetizer or snack.
Print Recipe Pin Recipe
Prep Time 10 minutes mins
Cook Time 0 minutes mins
Total Time 10 minutes mins
Course Appetizer
Cuisine Mediterranean
Servings 6

Ingredients
  

  • 1 6.5 ounce Jar marinated artichoke hearts
  • 1/2 cup Black olives
  • 1/2 cup Grape tomatoes
  • 2 Cloves garlic
  • 2 tablespoon Fresh basil
  • 1/8 tablespoon Crushed red pepper flakes
  • Salt and pepper (to taste)

Instructions
 

  • Drain artichokes, reserving 2 T. of the marinating liquid. Coarsely chop the artichokes, olives and tomatoes.
  • Place in a small bowl. Finely mince garlic and basil. Stir into bowl along with seasonings and reserved marinade.
  • Cover and refrigerate at least one hour before serving.

Notes

  • Mix up the basic Artichoke Salsa recipe my adding some capers, red onion, goat cheese, cucumbers, roasted eggplant, or any other add-ins that appeal to you.
  • Serve with pitas, pita chips, flatbread, tortilla chips, bagel chips, pretzel thins, toasted Italian bread, or water crackers.
  • If possible, prep the recipe at least 30 minutes before you plan to serve it so that the flavors have a chance to combine. 
  • The salsa will stay good in the fridge for up to 5 days. I do not recommend freezing.
Keyword Artichoke Salsa

More recipes you might enjoy:

  • Melon Salad with Mint
  • Turkey & Pesto Pasta Salad
  • Chicken with Brown Butter & Capers
  • Mediterranean Roasted Artichokes

Filed Under: Appetizers & Snacks, Recipes

  • « Go to Previous Page
  • Page 1
  • Page 2
  • Page 3
  • Page 4
  • Interim pages omitted …
  • Page 6
  • Go to Next Page »

Primary Sidebar

Hi! I’m Kate!

Welcome to Cooking During Stolen Moments. I share family-friendly, mostly from-scratch recipes that are as budget-friendly as they are delicious. Learn more about me...

Let’s Connect

  • facebook
  • twitter
  • instagram
  • pinterest

Popular Recipes

Glazed Blueberry Biscuits

Prepared portillo's chopped salad in a serving bowl

Portillo’s Chopped Salad Recipe

salad on a plate dressed with avocado lime ranch dressing

Avocado Lime Ranch Dressing

Slice of crustless coconut pie on a plate.

Crustless Coconut Pie

Copyright © 2025 Cooking During Stolen Moments on the Foodie Pro Theme